集成MyBatis(Windows)
跳过测试类打包
需求说明
说明: maven执行打包命令时, 默认条件下,会执行测试类中的方法. 并且这些方法都要执行. 隐患 可能某些测试方法由于种种原因 执行报错. 则install的操作执行失败.
矛盾点: 项目打包与test类之间的问题.
解决方案: 要求install时 不要执行test方法,
跳过测试类打包
   <properties>
        <!--指定JDK版本-->
        <java.version>1.8</java.version>
        <!--跳过测试类打包-->
        <skipTests>true</skipTests>
    </properties>
创建项目
手动创建项目
- 选择方式

2.编辑项目
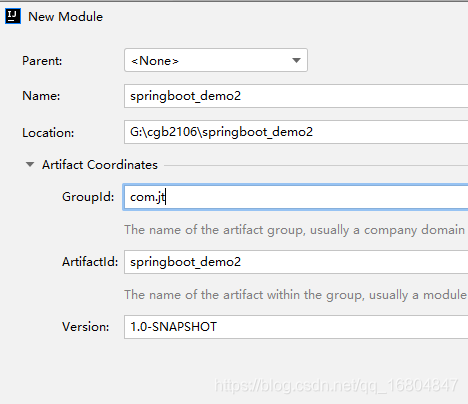
3.导入pom.xml
 <parent>
        <groupId>org.springframework.boot</groupId>
        <artifactId>spring-boot-starter-parent</artifactId>
        <version>2.5.3</version>
        <relativePath/>
    </parent>

    <properties>
        <!--指定JDK版本-->
        <java.version>1.8</java.version>
        <!--跳过测试类打包-->
        <skipTests>true</skipTests>
    </properties>

    <!--按需导入
        历史说明: 2010 原来SSM 需要手动的编辑大量的的配置文件
        思想: SpringBoot使用体现了"开箱即用"的思想
    -->
    <dependencies>
        <dependency>
            <groupId>org.springframework.boot</groupId>
            <!--Springboot的启动器 在内部已经将整合的配置写好,实现拿来就用-->
            <artifactId>spring-boot-starter-web</artifactId>
        </dependency>

        <dependency>
            <groupId>org.springframework.boot</groupId>
            <artifactId>spring-boot-starter-test</artifactId>
            <scope>test</scope>
        </dependency>

        <!--支持热部署 -->
        <dependency>
            <groupId>org.springframework.boot</groupId>
            <artifactId>spring-boot-devtools</artifactId>
        </dependency>

        <!--引入插件lombok 自动的set/get/构造方法插件  -->
        <dependency>
            <groupId>org.projectlombok</groupId>
            <artifactId>lombok</artifactId>
        </dependency>


    </dependencies>

    <!--build标签
        springboot项目在打包部署发布时,需要依赖maven工具API
        如果不添加该插件,则直接影响项目发布
    -->
    <build>
        <plugins>
            <plugin>
                <groupId>org.springframework.boot</groupId>
                <artifactId>spring-boot-maven-plugin</artifactId>
                <version>2.5.3</version>
            </plugin>
        </plugins>
    </build>
- 编辑主启动类
@SpringBootApplication
public class RunAPP {

    public static void main(String[] args) {

        SpringApplication.run(RunAPP.class,args);
    }
}
导入数据库
链接数据库
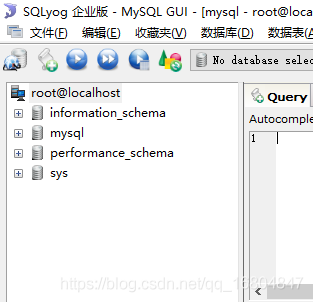
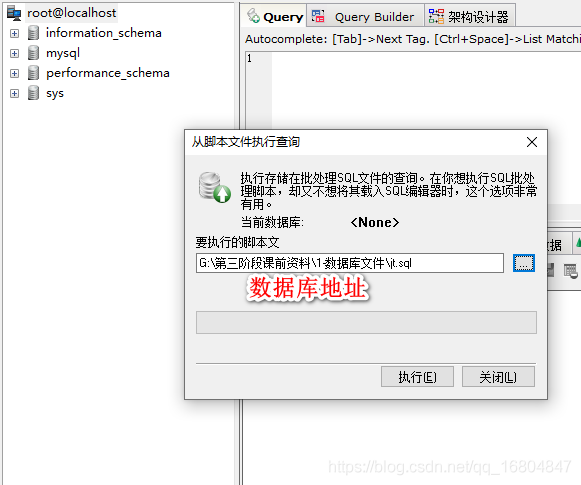
导入数据库
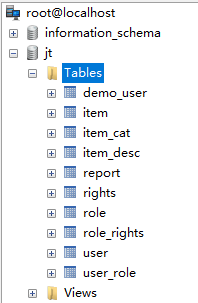
说明: 导入数据库之后,需要刷新数据库即可.
注意事项: 使用资料中提供的版本.
整合mybatis
序列化作用
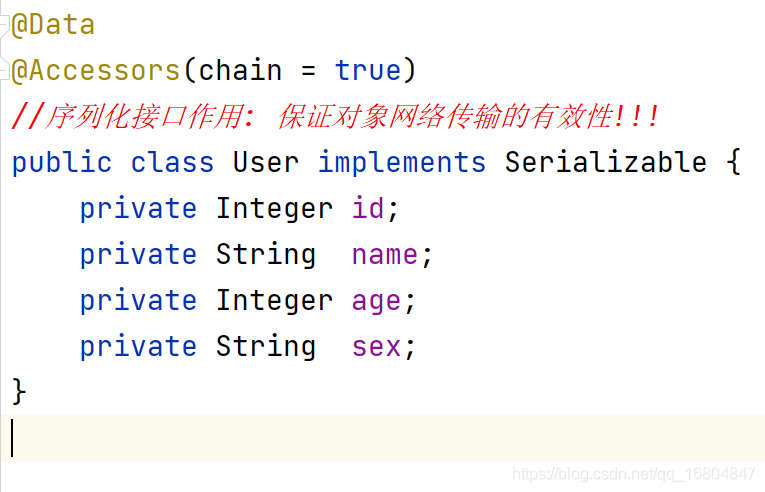
导入jar包
导入3个jar包
<parent>
        <groupId>org.springframework.boot</groupId>
        <artifactId>spring-boot-starter-parent</artifactId>
        <version>2.5.3</version>
        <relativePath/>
    </parent>

    <properties>
        <!--指定JDK版本-->
        <java.version>1.8</java.version>
        <!--跳过测试类打包-->
        <skipTests>true</skipTests>
    </properties>

    <!--按需导入
        历史说明: 2010 原来SSM 需要手动的编辑大量的的配置文件
        思想: SpringBoot使用体现了"开箱即用"的思想
    -->
    <dependencies>
        <dependency>
            <groupId>org.springframework.boot</groupId>
            <!--Springboot的启动器 在内部已经将整合的配置写好,实现拿来就用-->
            <artifactId>spring-boot-starter-web</artifactId>
        </dependency>

        <dependency>
            <groupId>org.springframework.boot</groupId>
            <artifactId>spring-boot-starter-test</artifactId>
            <scope>test</scope>
        </dependency>

        <!--支持热部署 -->
        <dependency>
            <groupId>org.springframework.boot</groupId>
            <artifactId>spring-boot-devtools</artifactId>
        </dependency>

        <!--引入插件lombok 自动的set/get/构造方法插件  -->
        <dependency>
            <groupId>org.projectlombok</groupId>
            <artifactId>lombok</artifactId>
        </dependency>

        <!--引入数据库驱动 -->
        <dependency>
            <groupId>mysql</groupId>
            <artifactId>mysql-connector-java</artifactId>
            <scope>runtime</scope>
        </dependency>

        <!--springBoot数据库连接  -->
        <dependency>
            <groupId>org.springframework.boot</groupId>
            <artifactId>spring-boot-starter-jdbc</artifactId>
        </dependency>

        <!--spring整合mybatis  暂时  -->
        <dependency>
            <groupId>org.mybatis.spring.boot</groupId>
            <artifactId>mybatis-spring-boot-starter</artifactId>
            <version>2.2.0</version>
        </dependency>

    </dependencies>

    <!--build标签
        springboot项目在打包部署发布时,需要依赖maven工具API
        如果不添加该插件,则直接影响项目发布
    -->
    <build>
        <plugins>
            <plugin>
                <groupId>org.springframework.boot</groupId>
                <artifactId>spring-boot-maven-plugin</artifactId>
                <version>2.5.3</version>
            </plugin>
        </plugins>
    </build>
编辑YML文件
编辑 1.数据源 2.整合mybatis
#端口配置
server:
  port: 8090

#配置数据源
spring:
  datasource:
    #如果使用高版本驱动 则添加cj
    driver-class-name: com.mysql.cj.jdbc.Driver
    url: jdbc:mysql://127.0.0.1:3306/jt?serverTimezone=GMT%2B8&useUnicode=true&characterEncoding=utf8&autoReconnect=true&allowMultiQueries=true
    username: root
    password: root

#Spring整合Mybatis
mybatis:
  #定义别名包
  type-aliases-package: com.jt.pojo
  #导入映射文件
  mapper-locations: classpath:/mappers/*.xml
  #开启驼峰映射
  configuration:
    map-underscore-to-camel-case: true
数据源配置
spring:
  datasource:
    #如果使用高版本驱动 则添加cj
    driver-class-name: com.mysql.cj.jdbc.Driver
    url: jdbc:mysql://127.0.0.1:3306/jt?serverTimezone=GMT%2B8&useUnicode=true&characterEncoding=utf8&autoReconnect=true&allowMultiQueries=true
    username: root
    password: root
数据库配置参数:
1.serverTimezone=GMT%2B8& 时区
2.useUnicode=true& 是否使用unicode编码
3.characterEncoding=utf8& 字符集使用utf-8
4.autoReconnect=true& 自动重连
5.allowMultiQueries=true 运行批量操作
编辑映射文件
关键词: namespace id 标签 别名 resultType resultMap
<?xml version="1.0" encoding="UTF-8" ?>
<!DOCTYPE mapper
  PUBLIC "-//mybatis.org//DTD Mapper 3.0//EN"
  "http://mybatis.org/dtd/mybatis-3-mapper.dtd">
<mapper namespace="com.jt.mapper.UserMapper">

    <!--Oracle中 ;号必定报错  不要加;号  -->
    <select id="findAll" resultType="com.jt.pojo.User">
        select * from demo_user
    </select>

</mapper>
编辑主启动类
关键词: mapper/dao(接口) Spring为接口创建对象
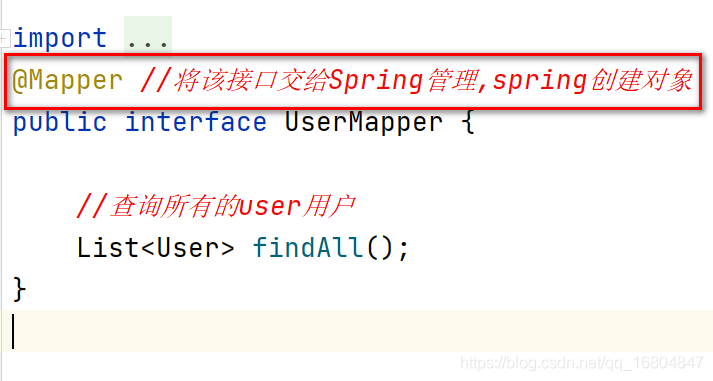
Spring管理Mapper接口(方式一)
说明: @Mapper注解 一般标识接口中. 如果有多个接口,则应该标识多次.
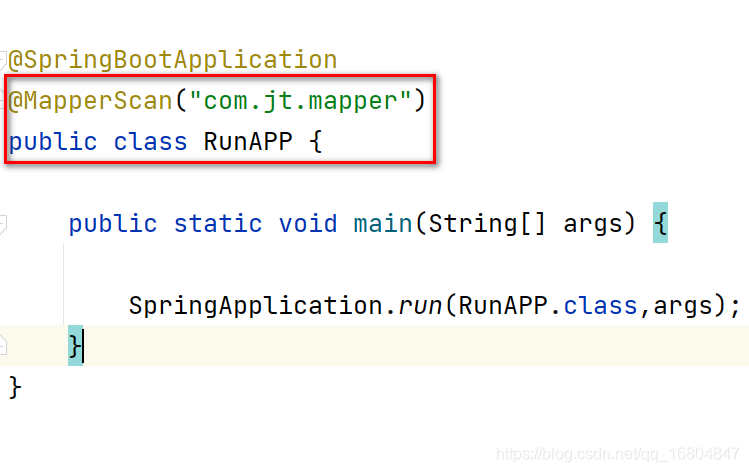
优化: 可以采用 @MapperScan(“xxxx”)进行优化.
Spring管理Mapper接口(方式二)
编辑测试类
@SpringBootTest
public class TestMybatis {

    @Autowired
    private UserMapper userMapper; //必须有对象!!!!

    @Test
    public void test01(){

        List<User> userList = userMapper.findAll();
        System.out.println(userList);
    }
}
关于整合的BUG
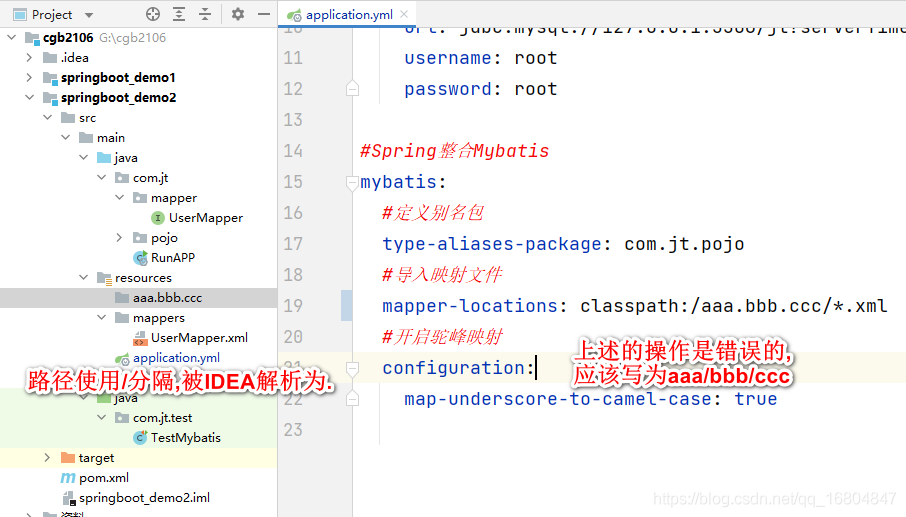
关于xml映射文件位置说明
说明: 如果xml的映射文件,则根目录下(不建议), 则加载时采用classpath😕.xml的结构.
强制加载根目录下的所有的xml文件.
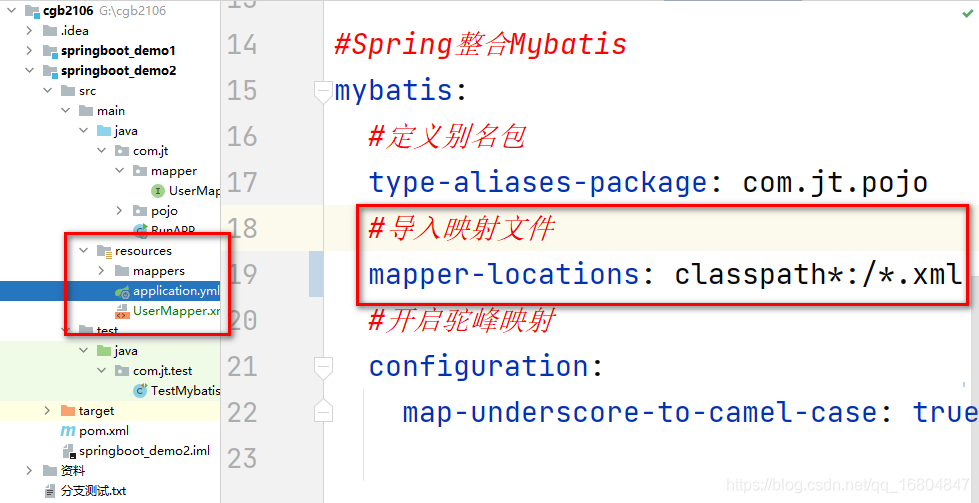
关于路径问题
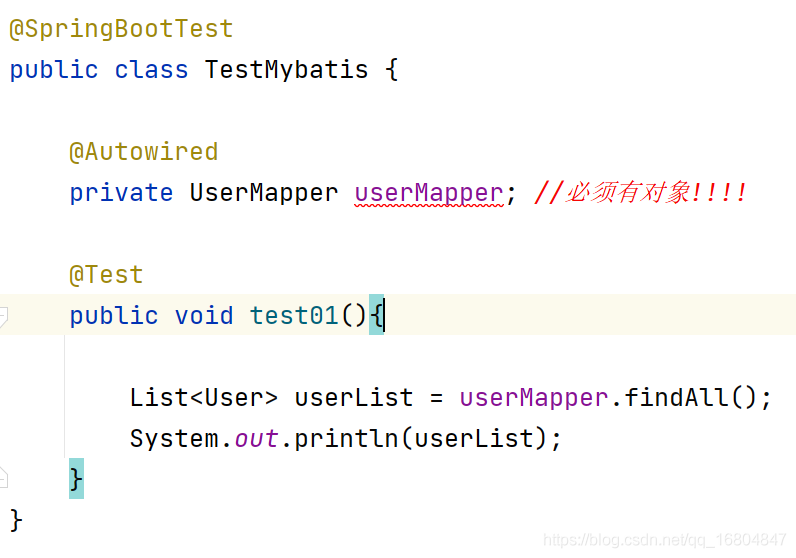
IDEA关于Mapper注入问题
说明: 通过包扫描的路径,在运行期间实现对象的创建. 实现了数据的绑定.所以下边的红线属于误报…
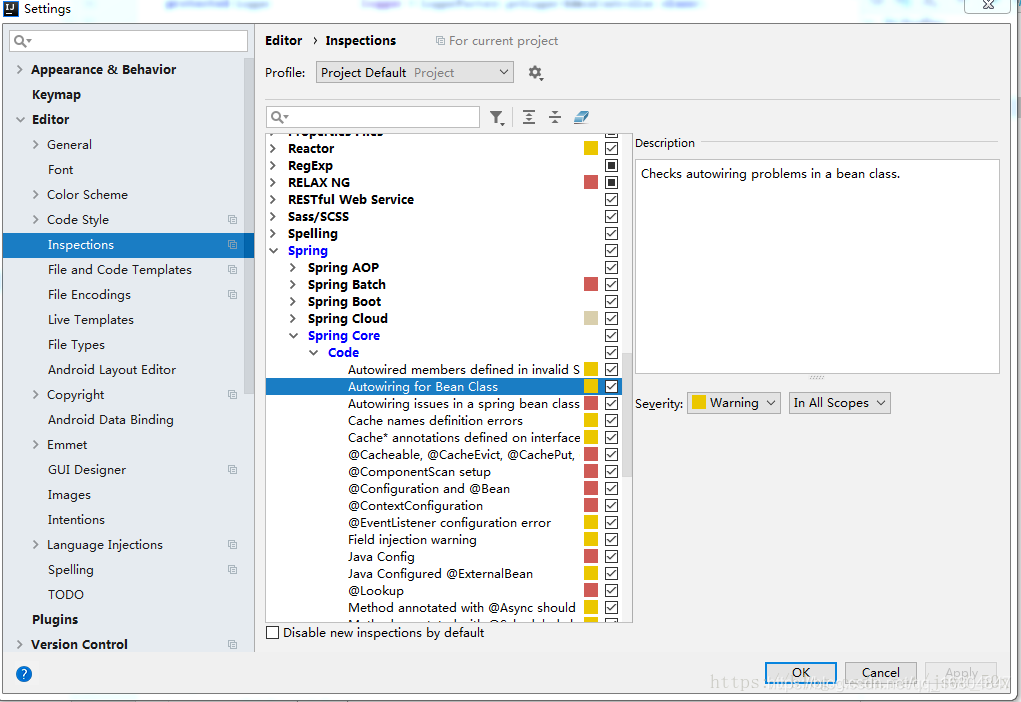
解决方案(一):
修改IDEA 数据校验 将√号去除即可.
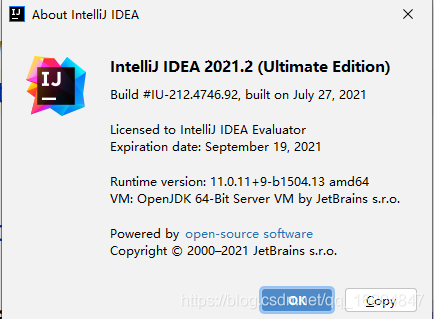
解决方案(二):
如果是最新版本的IDEA 则修改如下的选项
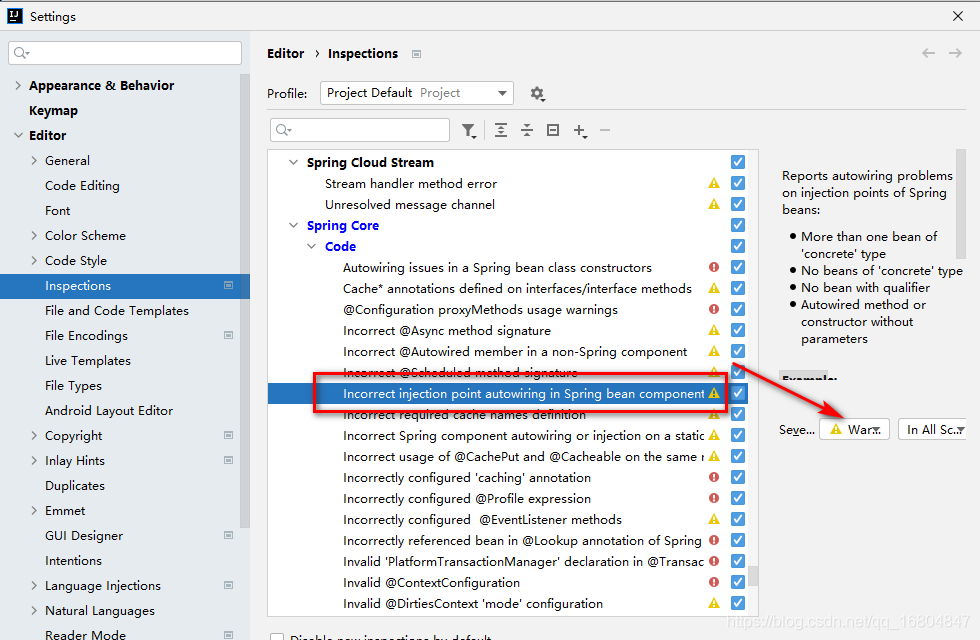
集成MyBatis(Linux)
实验步骤
在 SSM 整合 Mybatis 时,配置起来还是比较繁琐的。而在 Spring Boot 中,则大大降低了整合 Mybatis 的难度,它帮我们自动配置了 Mybatis 的相关组件,做到了真正的开箱即用。
接下来学习使用 SpringBoot 整合 Mybatis,并且开发一个简单的 restful 风格的 web 项目。
REST(英文:Representational State Transfer,简称 REST)描述了一个架构样式的网络系统,比如 web 应用程序。它首次出现在 2000 年 Roy Fielding 的博士论文中,Roy Fielding 是 HTTP 规范的主要编写者之一。在目前主流的三种 Web 服务交互方案中,REST 相比于 SOAP(Simple Object Access protocol,简单对象访问协议)以及 XML-RPC 更加简单明了,无论是对 URL 的处理还是对 Payload 的编码,REST 都倾向于用更加简单轻量的方法设计和实现。值得注意的是 REST 并没有一个明确的标准,而更像是一种设计的风格。-------来自百度百科 由于 maven 下载包需要联网,这里先将 maven 包下载下来,放到本地仓库便可以解决联网的问题
wget http://labfile.oss.aliyuncs.com/courses/1152/m2.zip
unzip m2.zip
mv .m2 /home/shiyanlou/
新建项目
新建一个 maven 项目springboot,建立如下目录结构,建立项目的过程可以参照实验 2,这里不再赘述。
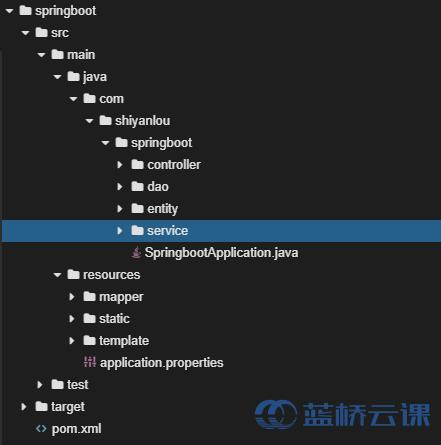
建立好了目录结构,将依赖包加入到项目中。在 maven 的配置文件pom.xml中加入下面的依赖
<?xml version="1.0" encoding="UTF-8"?>
<project xmlns="http://maven.apache.org/POM/4.0.0" xmlns:xsi="http://www.w3.org/2001/XMLSchema-instance"
    xsi:schemaLocation="http://maven.apache.org/POM/4.0.0 http://maven.apache.org/xsd/maven-4.0.0.xsd">
    <modelVersion>4.0.0</modelVersion>

    <groupId>com.shiyanlou</groupId>
    <artifactId>springboot</artifactId>
    <version>0.0.1-SNAPSHOT</version>
    <packaging>jar</packaging>

    <name>springboot</name>
    <description>Demo project for Spring Boot</description>

    <!--设置父模块 这样就可以继承父模块中的配置信息-->
    <parent>
        <groupId>org.springframework.boot</groupId>
        <artifactId>spring-boot-starter-parent</artifactId>
        <version>2.0.4.RELEASE</version>
        <relativePath/>
    </parent>

    <properties>
        <project.build.sourceEncoding>UTF-8</project.build.sourceEncoding>
        <project.reporting.outputEncoding>UTF-8</project.reporting.outputEncoding>
        <java.version>1.8</java.version>
    </properties>

    <dependencies>
    <!--添加web依赖-->
        <dependency>
            <groupId>org.springframework.boot</groupId>
            <artifactId>spring-boot-starter-web</artifactId>
        </dependency>
        <dependency>
            <groupId>org.mybatis.spring.boot</groupId>
            <artifactId>mybatis-spring-boot-starter</artifactId>
            <version>1.3.2</version>
        </dependency>

        <dependency>
            <groupId>org.springframework.boot</groupId>
            <artifactId>spring-boot-starter-test</artifactId>
            <scope>test</scope>
        </dependency>

        <dependency>
            <groupId>mysql</groupId>
            <artifactId>mysql-connector-java</artifactId>
        </dependency>
    </dependencies>

    <build>
        <plugins>
        <!--spirng Boot maven插件-->
            <plugin>
                <groupId>org.springframework.boot</groupId>
                <artifactId>spring-boot-maven-plugin</artifactId>
            </plugin>
        </plugins>
    </build>

</project>
搭建数据库环境
启动 MySQL
如果 MySQL 数据库服务没有启动的话需要进行这一步操作。
在命令行中输入以下命令:
sudo service mysql start
启动后通过如下命令连接 MySQL 客户端,输入命令后按回车键即可。
sudo mysql -u root
登录后建立数据库。
CREATE DATABASE IF NOT EXISTS `shiyanlou`;
最后退出客户端。
exit;
创建表结构
在上一章节中,通过连接 MySQL 客户端来创建实验所需数据库和表结构。而在 Spring Boot 中,可以通过配置数据库 DDL(Data Definition language) 脚本和 DML(Data Manipulation Language )脚本来初始化数据库表结构和表中的数据。
在配置文件中配置下列三个属性配置便可以开启 DDL 脚本和 DML 脚本。
# 使用可用的DDL和DML脚本初始化数据源:总是
spring.datasource.initialization-mode=always
# 表结构初始化脚本(DDL)
spring.datasource.schema=classpath:db/schema.sql
# 数据初始化脚本(DML)
spring.datasource.data=classpath:db/data.sql
同时需在 resources 目录下提供 schema.sql 和 data.sql 脚本文件。
schema.sql 文件内容如下所示,若当前数据库中不存在 tb_user 表,则创建表结构。
USE `shiyanlou`;
DROP TABLE IF EXISTS `tb_user`;
CREATE TABLE `tb_user`  (
  `user_id` int(11) NOT NULL ,
  `user_name` varchar(20)  DEFAULT NULL,
  `user_age` int(11)  DEFAULT NULL,
   PRIMARY KEY (`user_id`)
) ENGINE = InnoDB;
data.sql 文件内容如下所示,其中 replace into 语句用于向数据库中插入或更新数据,当数据库中已存在当前主键的值,则更新数据,若不存在,则插入数据。
REPLACE INTO `tb_user` (`user_id`, `user_name`, `user_age`) VALUES ('100', 'test01', '100');
当通过如上方式配置后,每次启动 Spring Boot 程序都会自动执行 DDL 和 DML 脚本来初始化表结构和数据。
当前小结只是简要介绍一下这个功能,具体的实践在下一节实验内容。
整合Mybatis(注解版)
在 Spring Boot 整合 Mybatis 时,SQL 语句的编写可以使用注解(@Select、@Update 等)和映射文件(例如 UserMapper.xml)两种方式。下面将通过两个实验来分别学习这两种方式。
值得注意的是,注解提供了简单的方式来编写映射语句。但是比较复杂的 SQL 和 动态 SQL 还是建议采用映射文件。
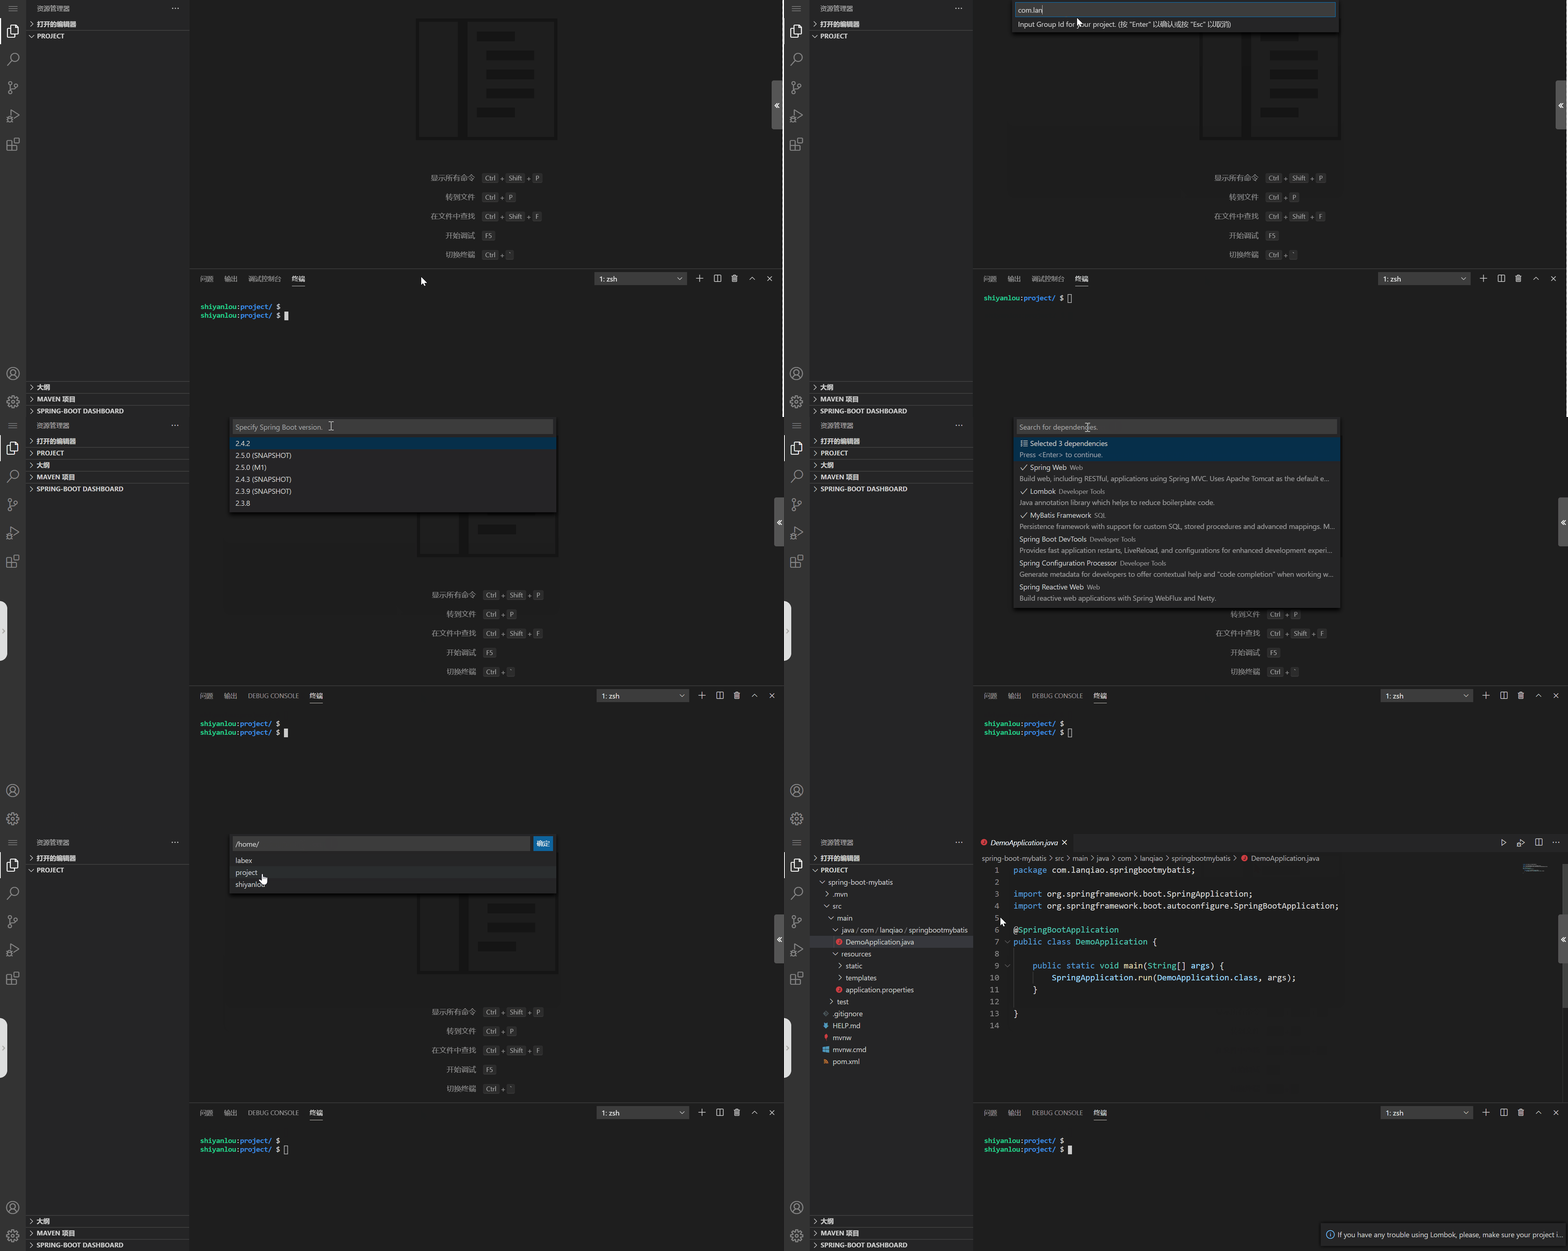
接下来,使用 VS Code 的 Spring Initializr 插件来创建 Spring Boot 项目。
-
输入快捷键
Ctrl+Shift+P显示所有命令,查找Spring initializr:Generate a Maven Project插件,创建 Spring Boot 项目。 -
按上图所示的方式创建项目,
Group Id值为输入com.lanqiao,Artifact Id输入spring-boot-mybatis。版本选择 2 以上的都可以,这里选择 2.4.2 ,添加
Spring Web,lombok,Mybatis以及Mysql数据库驱动依赖。 -
项目的默认存储路径是
/home/shiyanlou,这里选择/home/project文件夹,回车创建项目。此时会在左侧的代码区中显示创建的项目。
在项目中,需要借用 Swagger 进行接口功能测试。打开 pom.xml ,向文件中添加 Swagger2 依赖。
<!--Swagger2-->
<dependency>
    <groupId>io.springfox</groupId>
    <artifactId>springfox-swagger2</artifactId>
    <version>2.9.2</version>
</dependency>
<!--localhost:port/doc.html-->
<dependency>
    <groupId>com.github.xiaoymin</groupId>
    <artifactId>swagger-bootstrap-ui</artifactId>
    <version>1.9.6</version>
</dependency>
创建本次实验所需的包结构,在 src/main/java/com/lanqiao/springbootmybatis/ 下新建 entity 、dao 和 controller 文件夹。
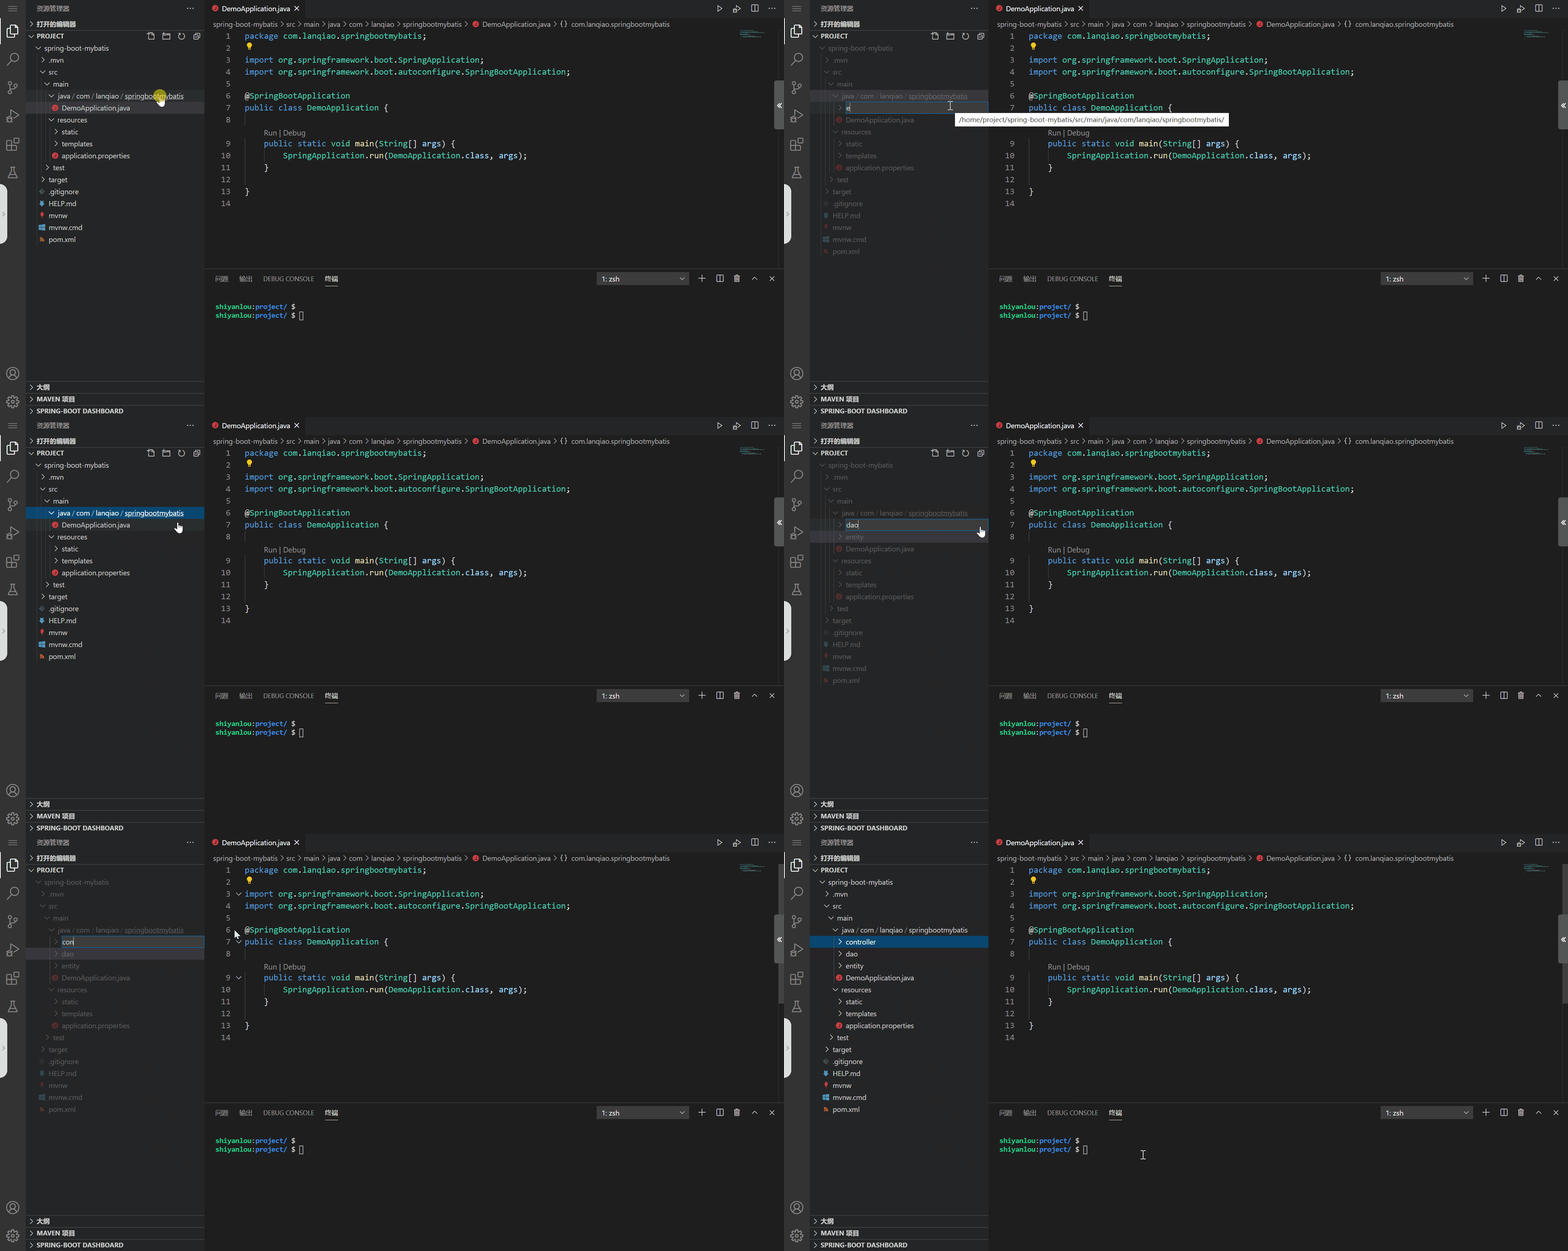
接着,创建一个 User 实体类,包含用户 id 、用户名称、用户年龄三个属性。在 com/lanqiao/.../entity 文件夹下新建 User.java 文件,文件内容如下。
package com.lanqiao.springbootmybatis.entity;

import lombok.Data;

/**
 * 用户表
 */
@Data
public class User {
    private Integer userId;
    private String userName;
    private Integer userAge;
}
在 User 类上,添加了 Lombok 插件的 @Data 注解,运行时会自动为类添加 Getter、Setter 、有参构造、toString 、equals 和 hashCode 方法。
在 com/lanqiao/.../dao 文件夹下新建 UserMapper.java 文件。在每个方法上添加对应的注解,描述执行的 SQL 语句。
package com.lanqiao.springbootmybatis.dao;

import org.apache.ibatis.annotations.Delete;
import org.apache.ibatis.annotations.Insert;
import org.apache.ibatis.annotations.Select;
import org.apache.ibatis.annotations.Update;
import org.springframework.stereotype.Repository;

import java.util.List;

import com.lanqiao.springbootmybatis.entity.User;

// 代表持久层
@Repository
public interface UserMapper {

    @Select("select user_id,user_name,user_age from tb_user")
    List<User> findAll();

    @Select("select user_id,user_name,user_age from tb_user where user_id = #{userId}")
    User findById(Integer userId);

    @Insert("insert into tb_user (user_id,user_name,user_age) values (#{userId},#{userName},#{userAge})")
    Integer insert(User user);

    @Update("update tb_user set user_name = #{userName} where user_id = #{userId}")
    Integer update(Integer userId, String userName);

    @Delete("delete from tb_user where user_id = #{userId}")
    Integer delete(Integer userId);

}
创建完 Mapper 接口后,Spring Boot 需要扫描这些接口,才能生成代理类来执行方法。
在 Spring Boot 中,配置接口的扫描路径有两种方式:
- 在每个 Mapper 接口上都添加
@Mapper注解。这种方法有点鸡肋,当接口数量比较多的时候,不太实用,不推荐。 - 在 Spring Boot 的配置类上标注
@MapperScan("扫描包")注解,将包下的所有接口都进行扫描。
下面,在主程序类中配置 Mapper 接口的扫描路径(添加注解和导入包)。由于插件中已经创建好了 DemoApplication ,修改文件内容如下所示。
package com.lanqiao.springbootmybatis;

import org.mybatis.spring.annotation.MapperScan;
import org.springframework.boot.SpringApplication;
import org.springframework.boot.autoconfigure.SpringBootApplication;

@SpringBootApplication
@MapperScan("com.lanqiao.springbootmybatis.dao")
public class DemoApplication {

    public static void main(String[] args) {
        SpringApplication.run(DemoApplication.class, args);
    }

}
在 com/lanqiao/.../controller 文件夹下新建 UserController.java 文件。在 UserController 中,调用 UserMapper 接口完成对 User 数据的 CRUD 操作。
在该类上,添加了 @EnableSwagger2 注解,用于接口的在线测试。
package com.lanqiao.springbootmybatis.controller;

import org.springframework.beans.factory.annotation.Autowired;
import org.springframework.web.bind.annotation.*;
import springfox.documentation.swagger2.annotations.EnableSwagger2;

import java.util.List;

import com.lanqiao.springbootmybatis.dao.UserMapper;
import com.lanqiao.springbootmybatis.entity.User;

@EnableSwagger2
@RestController
@RequestMapping("/user")
public class UserController {

    // 从容器中根据类型获取UserMapper
    @Autowired
    private UserMapper userMapper;

    // 查询所有用户信息
    @GetMapping("/findAll")
    public List<User> findAll() {
        List<User> users = userMapper.findAll();
        return users;
    }

    // 根据id查询用户信息
    @GetMapping("/findById")
    public User findById(Integer id) {
        User user = userMapper.findById(id);
        return user;
    }

    // 插入用户
    @PostMapping("/insert")
    public String insert(User user) {
        userMapper.insert(user);
        return "插入成功,插入的数据为" + userMapper.findById(user.getUserId());
    }

    // 根据id更新用户
    @PutMapping("/update")
    public String update(Integer id, String username) {
        userMapper.update(id, username);
        return "更新成功后的数据为" + userMapper.findById(id);
    }

    // 根据id删除
    @DeleteMapping("/delete")
    public String delete(Integer id) {
        userMapper.delete(id);
        return "删除成功";
    }

}
打开 application.properties 文件,添加数据库的配置信息。
同时需要开启 Mybatis 驼峰式命名规则自动转换,自动将实体类字段按照驼峰转下划线形式进行转换。
例如:实体类字段的 userAge 转换为数据库表的 user_age 。
# 数据源
spring.datasource.driver-class-name=com.mysql.cj.jdbc.Driver
spring.datasource.url=jdbc:mysql://localhost:3306/shiyanlou?serverTimezone=UTC&useUnicode=true&characterEncoding=utf-8
spring.datasource.username=root
spring.datasource.password=
# 使用可用的DDL和DML脚本初始化数据源:总是
spring.datasource.initialization-mode=always
# 表结构初始化脚本(DDL)
spring.datasource.schema=classpath:db/schema.sql
# 数据初始化脚本(DML)
spring.datasource.data=classpath:db/data.sql
# Mybatis配置
# 开启驼峰式命名规则自动转换
mybatis.configuration.map-underscore-to-camel-case=true
在 resources 目录下新建 db 文件夹,在该文件夹下新建 schema.sql 和 data.sql 脚本文件。

Schema.sql 文件内容如下所示,若当前数据库中不存在 user 表,则创建表结构。
USE `shiyanlou`;
DROP TABLE IF EXISTS `tb_user`;
CREATE TABLE `tb_user`  (
  `user_id` int(11) NOT NULL ,
  `user_name` varchar(20)  DEFAULT NULL,
  `user_age` int(11) DEFAULT NULL,
   PRIMARY KEY (`user_id`)
) ENGINE = InnoDB;
data.sql 文件内容如下所示,其中 replace into 语句用于向数据库中插入或更新数据,当数据库中已存在当前主键的值,则更新数据,若不存在,则插入数据。
REPLACE INTO `tb_user` (`user_id`, `user_name`, `user_age`) VALUES ('100', 'test01', '100');
最后,点击 DemoApplication.java 中 Main 方法上的 Run 运行程序。
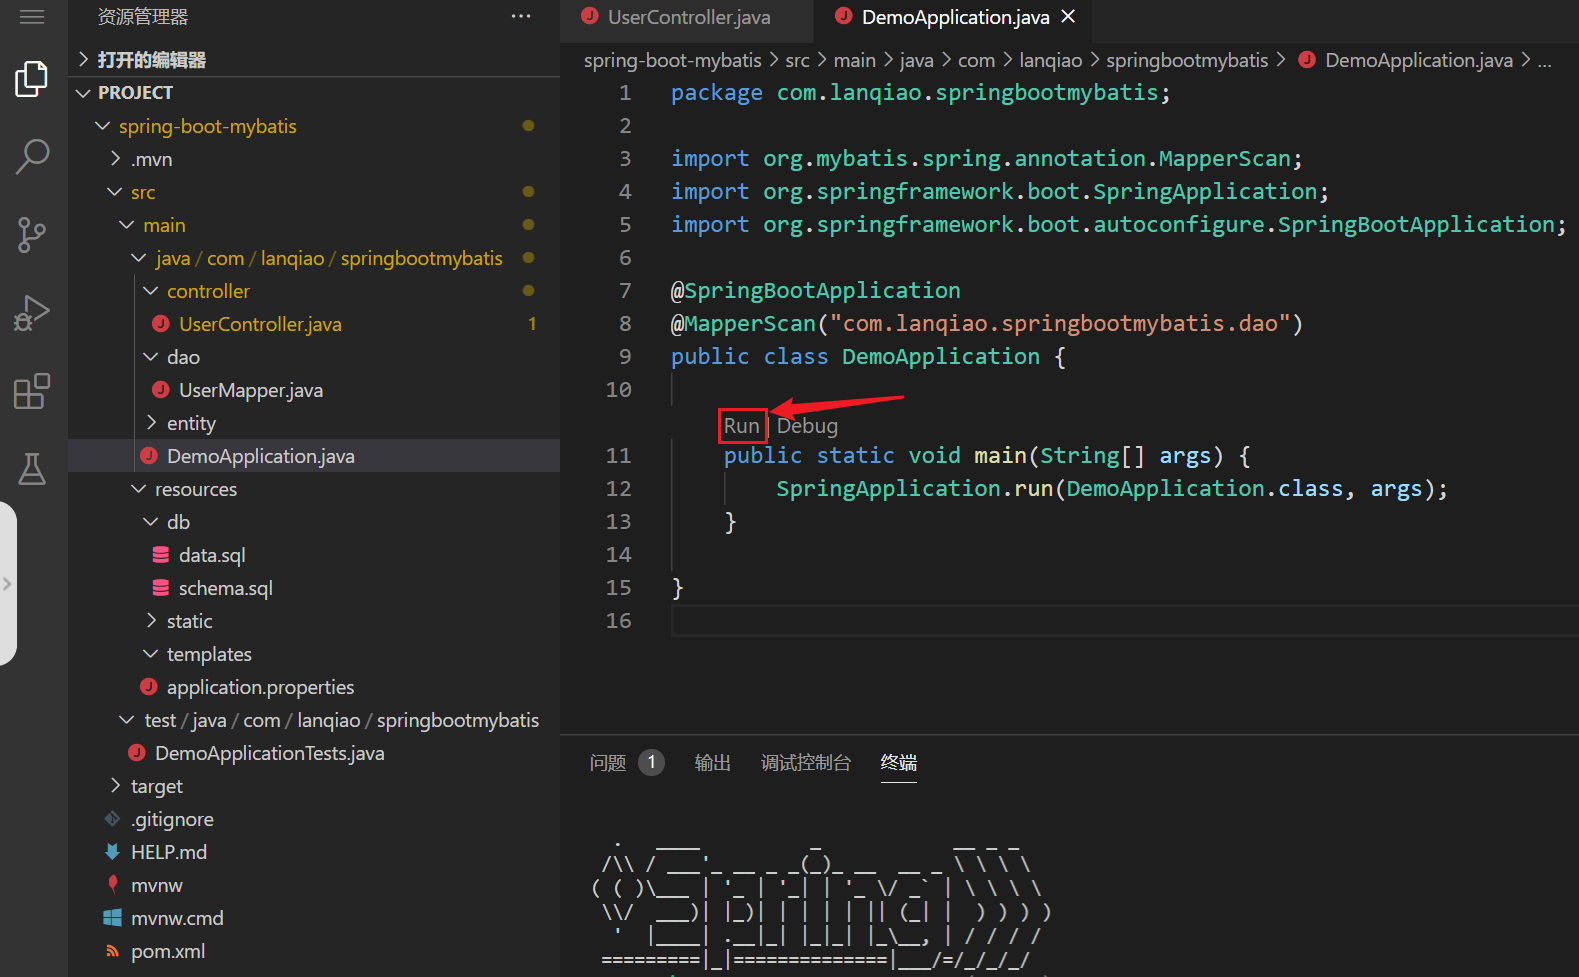
在没有配置数据源的情况下,Spring Boot 自动配置 HikariDataSource。

功能测试
脚本功能验证
当程序运行成功后,需要首先判断一下 DDL 和 DML 脚本是否运行成功。
- 在命令行中输入以下命令:
sudo mysql -u root
- 切换数据库。
use shiyanlou;
- 查询 user 表中数据。
select * from tb_user;
接口测试
打开右侧的工具栏,点击「 Web 服务」。此时,会在浏览器中打开一个网页,网页地址类似于 https://**************.simplelab.cn 。在地址后添加 Swagger 在线接口文档地址 /doc.html 。
-
添加用户
在文档左侧找到
User-Controller,点击insert方法,选择调试,便会进入到一个测试接口的界面。在对应的参数中输入值,点击发送,测试添加用户功能,添加成功后,会返回结果。
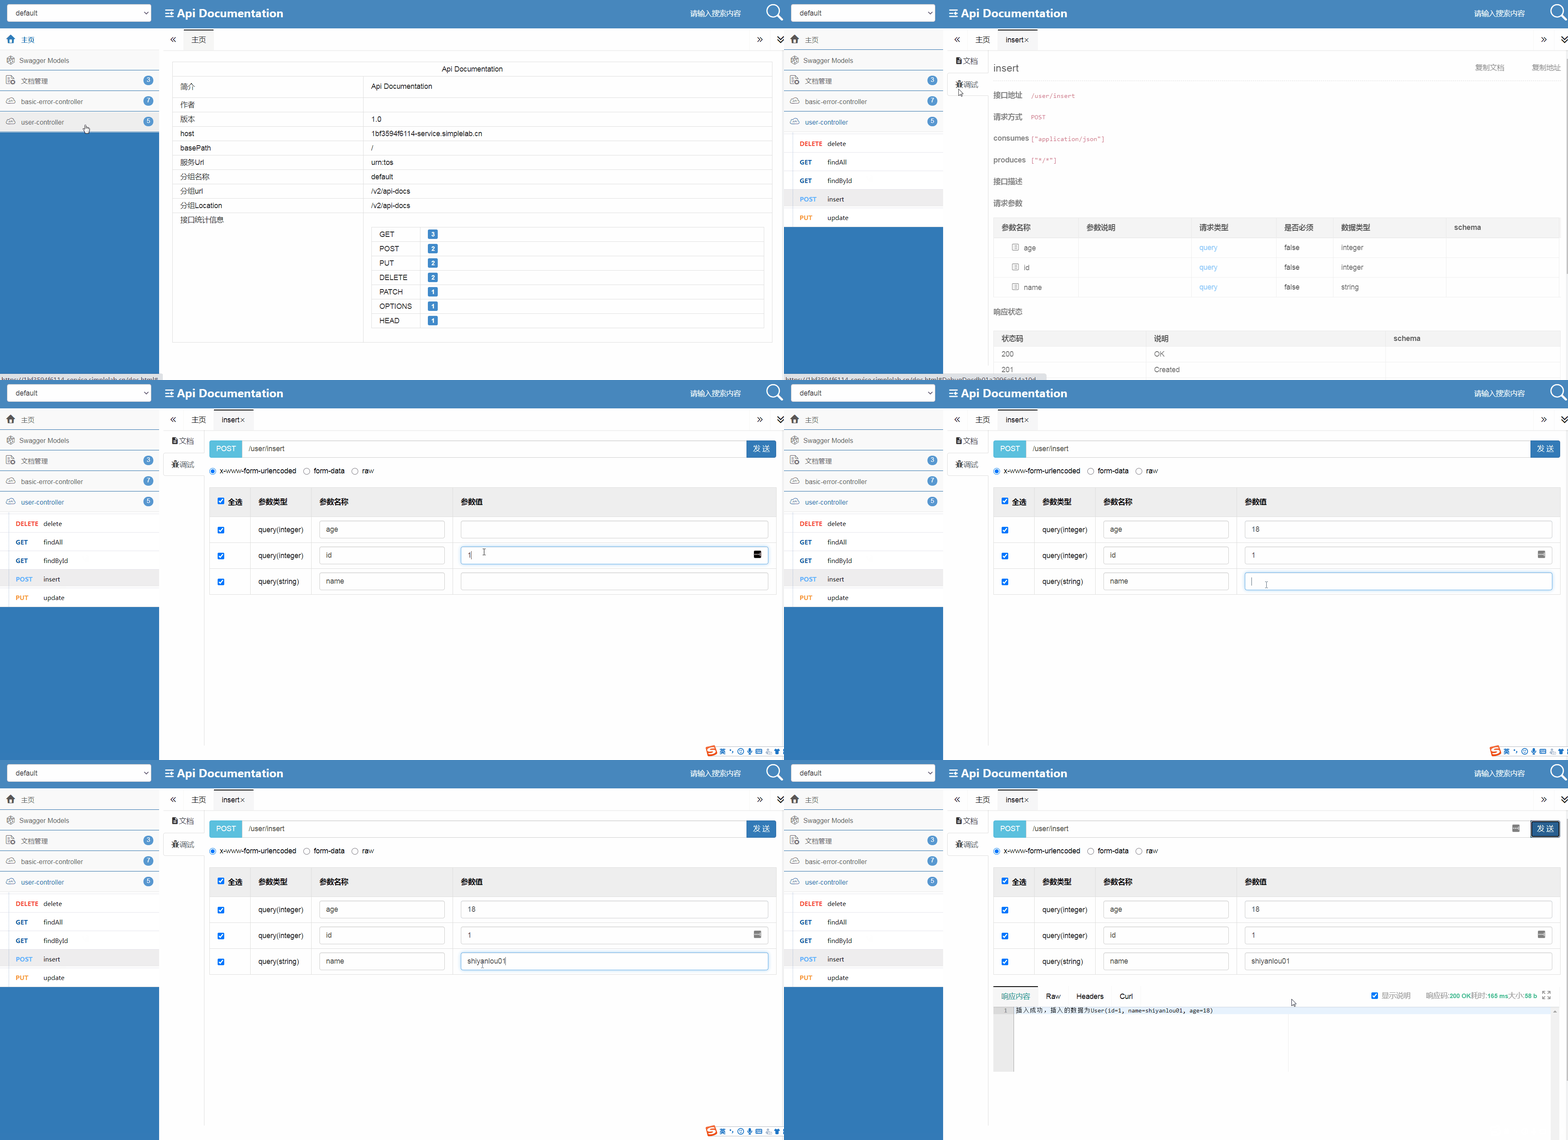
-
查询用户
点击
findById方法,选择调试。在参数 id 中输入 1,点击发送,测试查询用户功能。
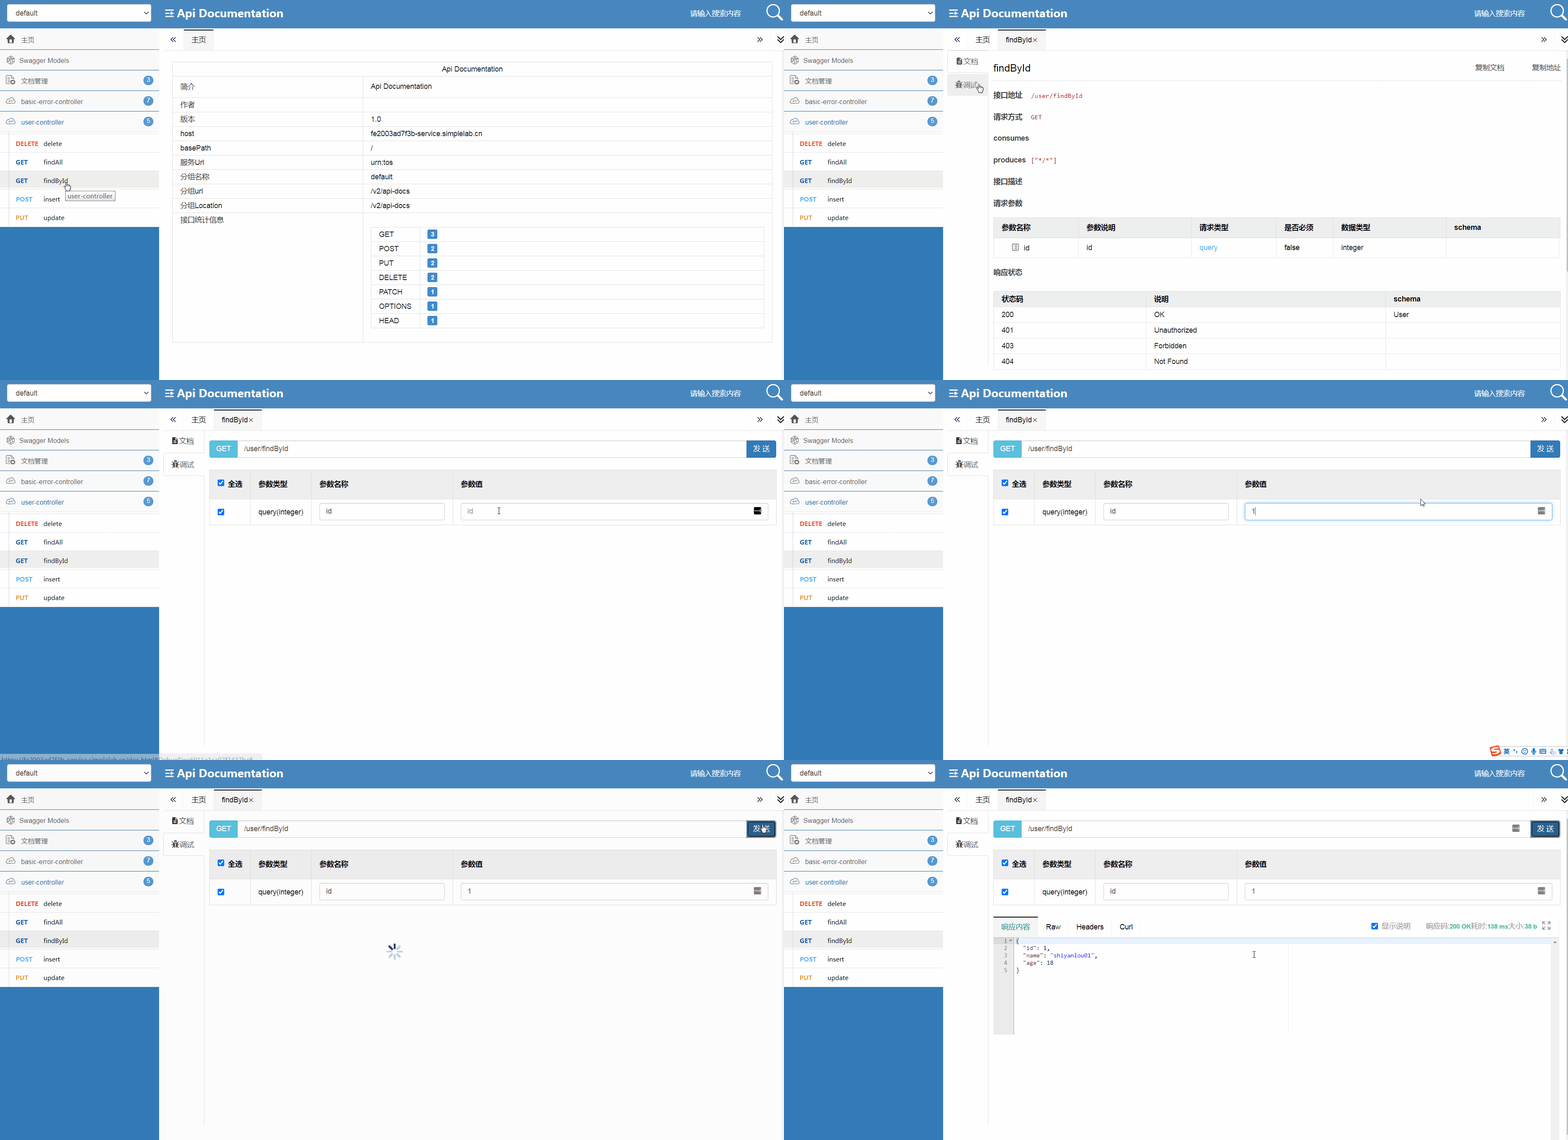
-
修改用户
点击
update方法,选择调试。在参数 id 中输入 1,参数 username 输入 update,点击发送,测试修改用户功能。
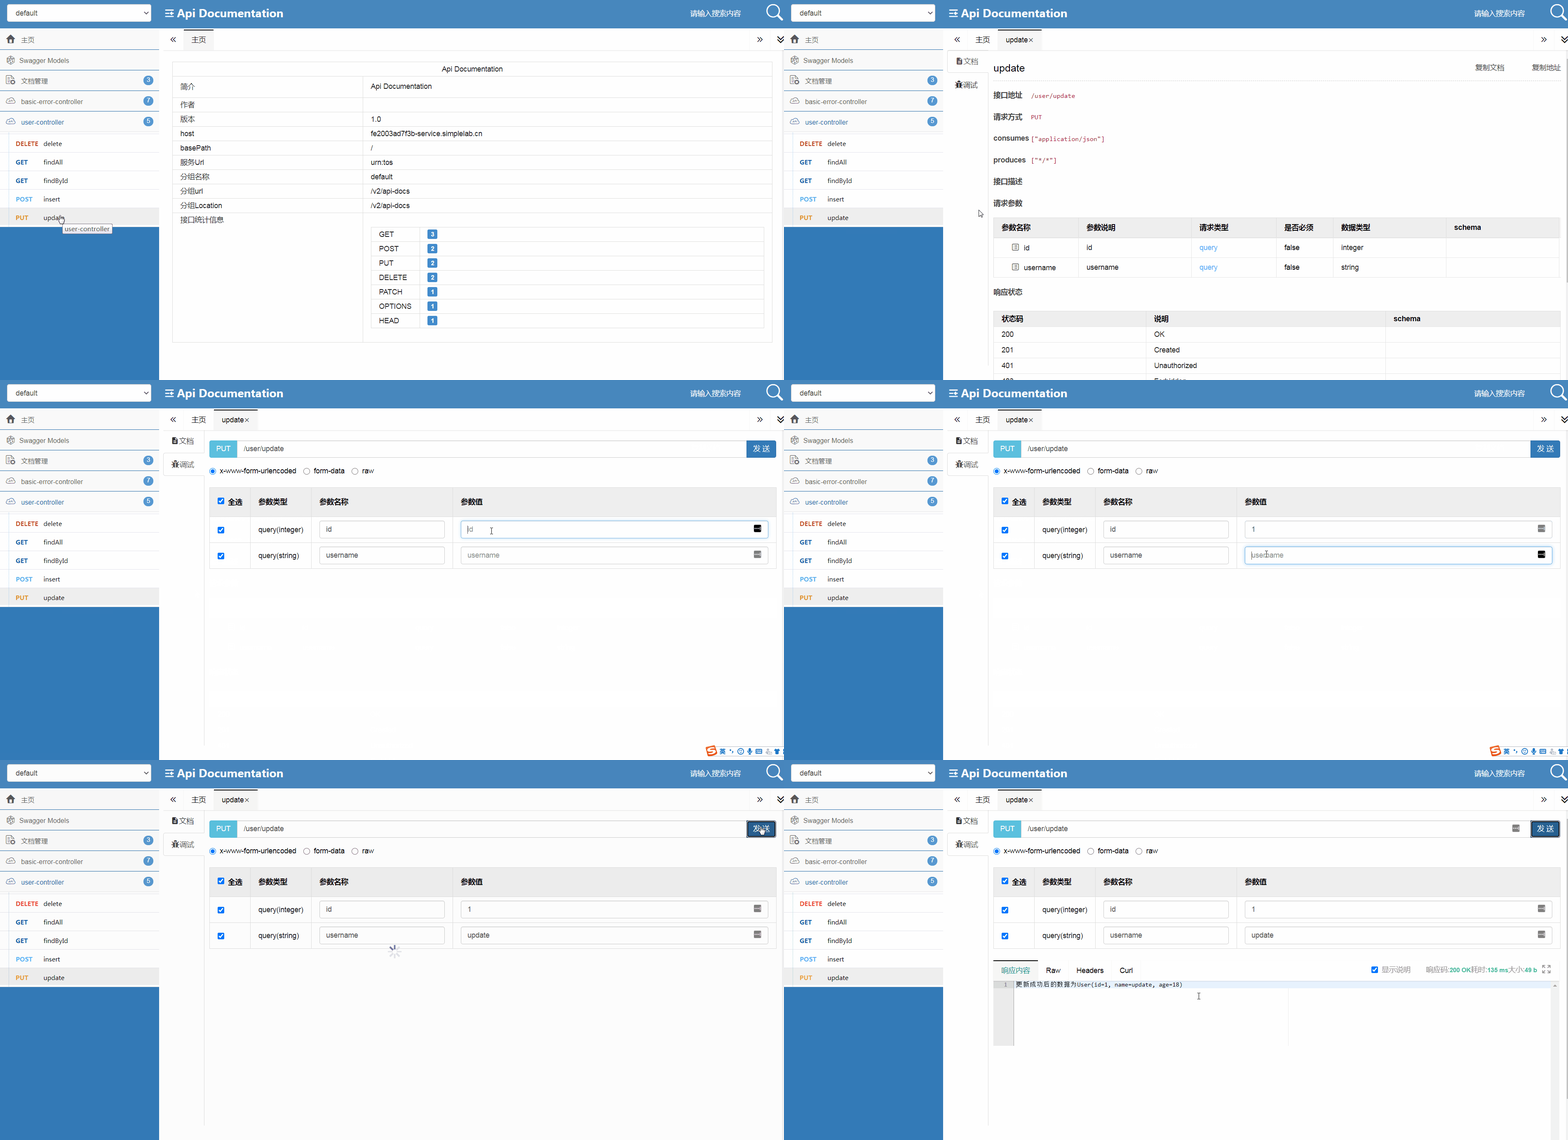
-
删除用户
点击
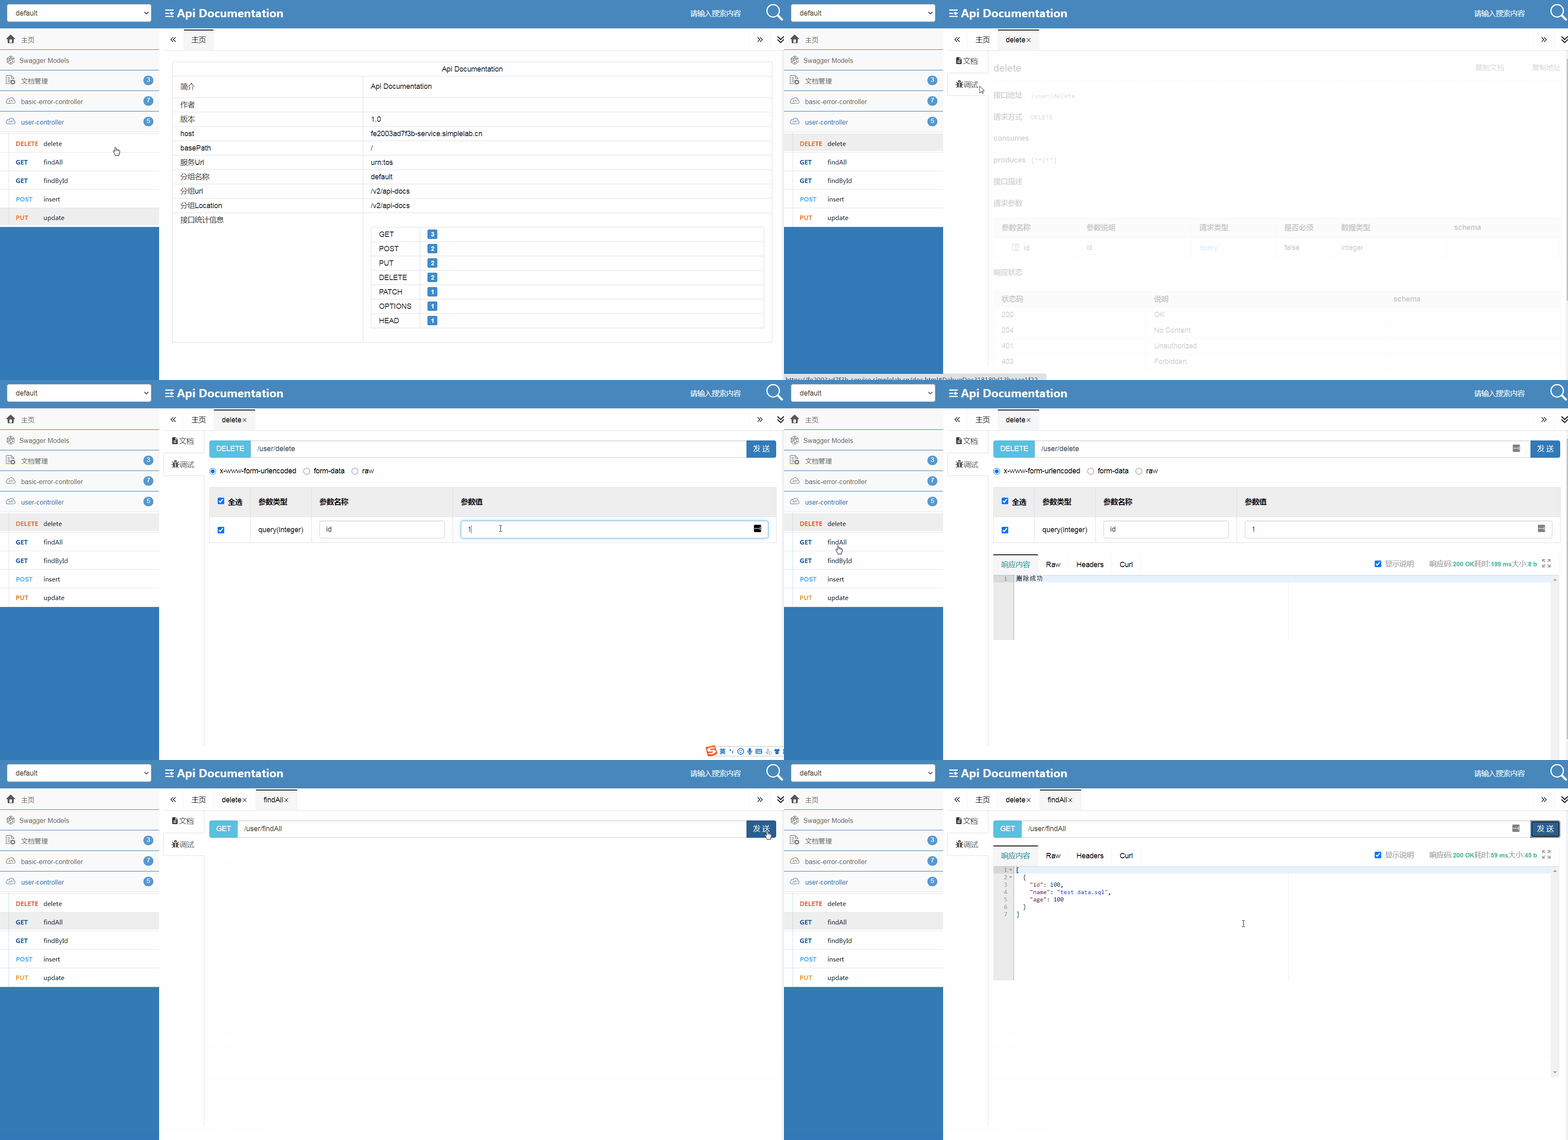
delete方法,选择调试。在参数 id 中输入 1,点击发送。当用户删除完成后,可以通过
findAll方法验证一下数据是否删除,点击findAll方法,选择调试,点击发送。可以看出 id 为 1 的用户数据已经成功删除。
整合 Mybatis(映射文件版)
在本小节中学习使用映射文件(XML )的方式来编写 SQL 映射语句。
当使用 XML 文件时,需要将 UserMapper 接口中方法上的注解删除,并添加对应的 UserMapper.xml ,接着在该文件中编写 SQL 映射语句。
修改 Mapper 接口文件
打开 com/lanqiao/.../dao 文件夹下的 UserMapper.java 文件,删除掉方法上的注解信息以及导入的包。为了方便,你可以直接用下面的文件内容进行替换。
package com.lanqiao.springbootmybatis.dao;

import org.springframework.stereotype.Repository;

import java.util.List;

import com.lanqiao.springbootmybatis.entity.User;

// 代表持久层
@Repository
public interface UserMapper {

    List<User> findAll();

    User findById(Integer userId);

    Integer insert(User user);

    Integer update(Integer userId, String userName);

    Integer delete(Integer userId);

}
添加 SQL 映射文件
同时,需要添加对应的 SQL 映射文件。在 resources 目录下新建 mapper 文件夹,在文件夹下新建 Mapper 接口同名的映射文件即 UserMapper.xml 文件。
<?xml version="1.0" encoding="UTF-8"?>
<!DOCTYPE mapper PUBLIC "-//mybatis.org//DTD Mapper 3.0//EN" "http://mybatis.org/dtd/mybatis-3-mapper.dtd">
<mapper namespace="com.lanqiao.springbootmybatis.dao.UserMapper">
    <!--查询所有用户-->
    <select id="findAll" resultType="user">
           select * from tb_user
    </select>
    <!--根据id查询单个用户-->
    <select id="findById" parameterType="int" resultType="user">
        select * from tb_user where user_id = #{userId}
    </select>
    <!--插入用户-->
    <insert id="insert" parameterType="user">
        insert into tb_user (user_id,user_name,user_age) values (#{userId},#{userName},#{userAge})
    </insert>
    <!--更新用户信息-->
    <update id="update" parameterType="map">
        update tb_user set user_name = #{userName} where user_id = #{userId}
    </update>
    <!--删除用户-->
    <delete id="delete" parameterType="int">
        delete from tb_user where user_id = #{userId}
    </delete>
</mapper>
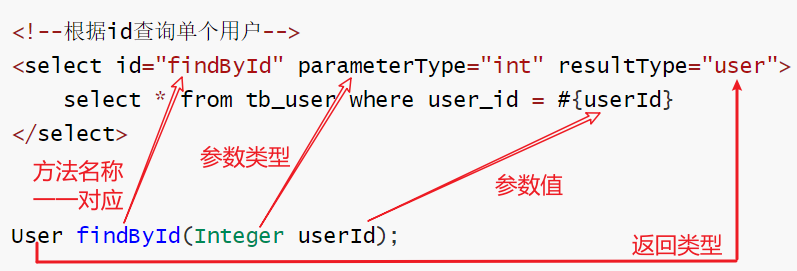
XML 文件中,<mapper/> 标签下的 namespace 属性与接口的全类名一一对应,用于唯一的标识一个 Mapper。
UserMapper 接口中的每一个方法都与 <mapper/> 标签下的子标签 一一对应,例如 findById 方法与其对应的标签存在如下关系。
在 SQL 语句中使用 #{} 来获取参数值, #{} 告诉 JDBC 这是一个预编译语句的参数,底层使用预编译 SQL 即 PrepareStatement ,可以防止 SQL 注入,提高安全性。底层实现类似下面所示:
// 近似的 JDBC 代码,非 MyBatis 代码...
String select = "SELECT * FROM `user` WHERE id=?";
PreparedStatement ps = conn.prepareStatement(select);
ps.setInt(1,id);
对于方法有多个参数的情况,可以选择将这几个参数封装为一个 POJO 类(带有 Setter,Getter 方法的对象)进行传参,例如上述中的 insert 方法中参数类型为 User 类。同时,也可以通过 Map 类型进行传参,例如 update 方法,在 parameterType 中选择 map 类型,然后通过 #{参数名称} 获取参数值。
添加 Mybatis 配置
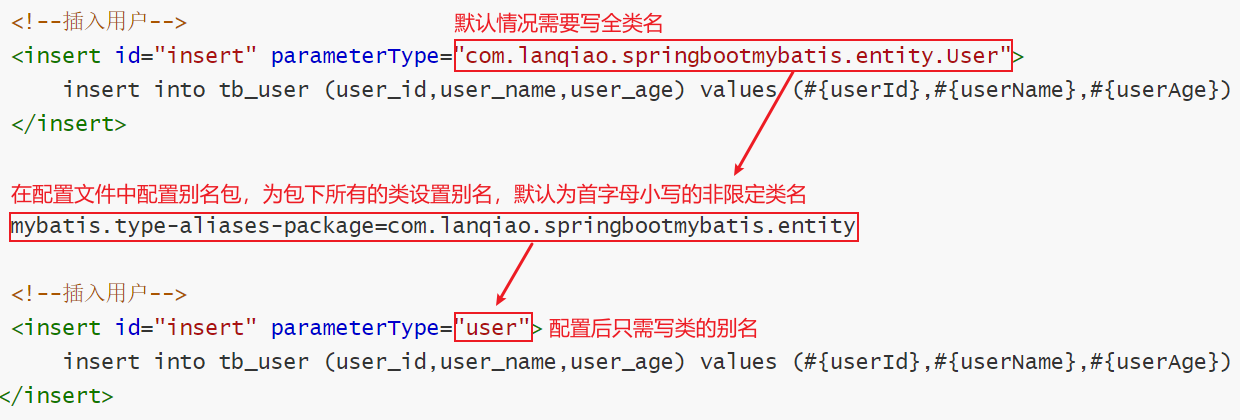
在 SQL 映射语句的编写过程中,当参数类型为 POJO (带有 Setter,Getter 方法的对象)时,默认情况下需要写类的全类名,例如 com.lanqiao.springbootmybatis.entity.User 。
但是当项目中 Mapper 接口比较多的情况下,一个个都写全类名就太繁琐了。此时,我们可以在配置文件中配置 mybatis.type-aliases-package 属性,根据配置的包名去扫描 JavaBean ,给包里每一个 JavaBean 创建一个别名,此时默认会使用 Bean 的首字母小写的非限定类名作为它的别名。
在 SQL 映射语句中指定参数类型时只需要写类的别名就可以了,如下所示:
在 Mybatis 中 XML 文件的位置默认放在和 Mapper 接口同一个包下,且要求映射文件的名称与接口文件相一致。
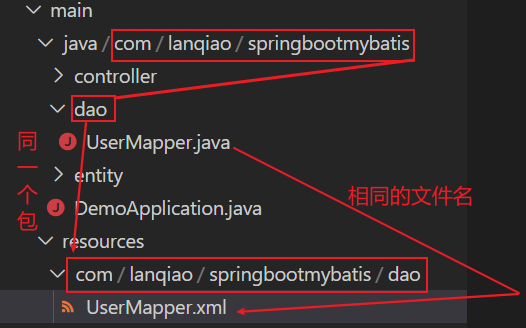
但是也可以自定义 SQL 映射文件的存放位置。刚才我们将映射文件放在了 mapper 文件夹下,这时只需要配置如下属性,便可以告诉 Mybatis 接口对应的映射文件在哪。
# xml文件放置在/src/main/resource/mapper/文件夹下
mybatis.mapper-locations=classpath:mapper/*Mapper.xml
打开 application.properties 文件,向配置文件中新增上述的 Mybatis 的相关配置。
# 数据源
spring.datasource.driver-class-name=com.mysql.cj.jdbc.Driver
spring.datasource.url=jdbc:mysql://localhost:3306/shiyanlou?serverTimezone=UTC&useUnicode=true&characterEncoding=utf-8
spring.datasource.username=root
spring.datasource.password=
# 使用可用的DDL和DML脚本初始化数据源:总是
spring.datasource.initialization-mode=always
# 表结构初始化脚本(DDL)
spring.datasource.schema=classpath:db/schema.sql
# 数据初始化脚本(DML)
spring.datasource.data=classpath:db/data.sql
# Mybatis配置
# 开启驼峰式命名规则自动转换
mybatis.configuration.map-underscore-to-camel-case=true
# 配置SQL映射文件的位置
mybatis.mapper-locations=classpath:mapper/*Mapper.xml
# 配置别名包
mybatis.type-aliases-package=com.lanqiao.springbootmybatis.entity
最后,点击 DemoApplication.java 中 Main 方法上的 Run 运行程序。
运行成功后,打开右侧的工具栏,点击「 Web 服务」。此时,会在浏览器中打开一个网页,网页地址类似于 https://**************.simplelab.cn 。
在网页地址后添加 Swagger 接口文档地址 /doc.html 。接着按之前的方式进行接口测试,这里不再赘述。
代码获取
wget https://labfile.oss.aliyuncs.com/courses/3038/spring-boot-mybatis.zip
实体类
在com.shiyanlou.springboot.entity中存放实体类,这里只建立了一个实体类 User.java
User.java
package com.shiyanlou.springboot.entity;

import java.io.Serializable;


public class User implements Serializable {
    private Integer id;
    private String username;
    private String password;

    public Integer getId() {
        return id;
    }

    public void setId(Integer id) {
        this.id = id;
    }

    public String getUsername() {
        return username;
    }

    public void setUsername(String username) {
        this.username = username;
    }

    public String getPassword() {
        return password;
    }

    public void setPassword(String password) {
        this.password = password;
    }

    @Override
    public String toString() {
        return "User{" +
                "id=" + id +
                ", username='" + username + '\'' +
                ", password='" + password + '\'' +
                '}';
    }
}
dao层
建立一个 BaseMapper.java 用于提取常用的公共方法,减少重复代码。
BaseMapper.java
在com.shiyanlou.springboot.dao中建立BaseMapper.java
package com.shiyanlou.springboot.dao;

import java.util.List;


public interface BaseMapper<T> {
    /**
     * 保存
     */
    Integer save(T t);

    /**
     * 删除
     */
    void delete(Integer id);

    /**
     * 通过id查询
     */
    T findById(Integer id);

    /**
     * 更新
     */
    void update(T t);

    /**
     * 返回所有信息
     */
    List<T> list();
}
UserMapper.java
在com.shiyanlou.springboot.dao中建立UserMapper.java,UserMapper.java继承BaseMapper.java
package com.shiyanlou.springboot.dao;

import com.shiyanlou.springboot.entity.User;

public interface UserMapper extends BaseMapper<User> {

}
如果 BaseMapper.java 中的方法不足以满足的需求,直接在UserMapper.java中添加对应的方法就可以了。
UserMapper.xml
在src/main/resources中建立mapper文件夹,在mapper中建立UserMapper.xml
<?xml version="1.0" encoding="UTF-8" ?>
<!DOCTYPE mapper PUBLIC "-//mybatis.org//DTD Mapper 3.0//EN" "http://mybatis.org/dtd/mybatis-3-mapper.dtd" >
<mapper namespace="com.shiyanlou.springboot.dao.UserMapper">
    <select id="list" resultType="com.shiyanlou.springboot.entity.User">
        select *
        from user
    </select>
    <select id="findById" parameterType="int" resultType="com.shiyanlou.springboot.entity.User">
        select *
        from user
        where id = #{value}
    </select>
    <update id="update" parameterType="com.shiyanlou.springboot.entity.User">
        update user
        <set>
            <if test="username!=null and username!=''">
                username=#{username},
            </if>
            <if test="password!=null and password!=''">
                `password`=#{password}
            </if>
        </set>
        where id=#{id}
    </update>
    <delete id="delete" parameterType="int">
        delete
        from user
        where id = #{value}
    </delete>
    <insert id="save" parameterType="com.shiyanlou.springboot.entity.User" keyColumn="id" keyProperty="id"
            useGeneratedKeys="true">
        insert into user (username, `password`)
        values (#{username}, #{password})
    </insert>
</mapper>
service 层
将 service 常用的公共方法抽象出来,如简单的增删查改等功能,这样可以减少很多的重复代码。
IBaseService.java
在com.shiyanlou.springboot.service中建立IBaseService.java

package com.shiyanlou.springboot.service;

import java.util.List;


public interface IBaseService<T> {

    /**
     * 保存
     */
    Integer save(T t);

    /**
     * 删除
     */
    void delete(Integer id);

    /**
     * 通过id查询
     */
    T findById(Integer id);

    /**
     * 更新
     */
    void update(T t);

    /**
     * 返回所有信息
     */
    List<T> list();
}
BaseServiceImpl.java
在com.shiyanlou.springboot.service.impl包中建立BaseServiceImpl.java, BaseServiceImpl.java作为IBaseService.java的实现类,用于实现公共的增删查改等功能。
package com.shiyanlou.springboot.service.impl;

import com.shiyanlou.springboot.dao.BaseMapper;
import com.shiyanlou.springboot.service.IBaseService;
import org.springframework.beans.factory.annotation.Autowired;
import org.springframework.transaction.annotation.Transactional;

import java.util.List;

@Transactional(rollbackFor = Exception.class)
public abstract class BaseServiceImpl<T> implements IBaseService<T> {

    @Autowired
    protected BaseMapper<T> baseMapper;

    @Override
    public void delete(Integer id) {
        baseMapper.delete(id);
    }

    @Override
    public Integer save(T t) {
        return baseMapper.save(t);
    }

    @Override
    public void update(T t) {
        baseMapper.update(t);
    }

    @Override
    public T findById(Integer id) {
        return baseMapper.findById(id);
    }


    @Override
    public List<T> list() {
        return baseMapper.list();
    }
}
IUserService.java
在com.shiyanlou.springboot.service中建立IUserService.java。 IUserService.java用于定义与User相关的业务功能,如果要自定义业务功能,直接在IUserService.java添加新的方法,然后在UserServiceImpl.java中实现即可。
package com.shiyanlou.springboot.service;

import com.shiyanlou.springboot.entity.User;


public interface IUserService extends IBaseService<User> {
}
UserServiceImpl.java
在com.shiyanlou.springboot.service中建立UserServiceImpl.java,UserServiceImpl.java用于实现和 User 有关的业务逻辑。如果对BaseServiceImpl.java提供的公用增删查改功能不满意,可以选择直接覆盖或者新填一个方法。
package com.shiyanlou.springboot.service.impl;

import com.shiyanlou.springboot.entity.User;
import com.shiyanlou.springboot.service.IUserService;
import org.springframework.stereotype.Service;

@Service
public class UserServiceImpl extends BaseServiceImpl<User> implements IUserService {

}
controller 层
在com.shiyanlou.controller中建立UserController.java
package com.shiyanlou.springboot.controller;

import com.shiyanlou.springboot.entity.User;
import com.shiyanlou.springboot.service.IUserService;
import org.springframework.beans.factory.annotation.Autowired;
import org.springframework.web.bind.annotation.*;

import java.util.List;

@RestController
@RequestMapping("user")
public class UserController {

    private final IUserService userService;

    @Autowired
    public UserController(IUserService userService) {
        this.userService = userService;
    }


    //使用post请求新建
    @PostMapping()
    public String save(User user) {
        userService.save(user);
        return "save success";
    }

    //使用put请求更新 会拦截类似/user/1这种形式的路径
    @PutMapping("{id}")
    public String update(User user, @PathVariable int id) {
        //当数据不存在时,不允许更新
        if (userService.findById(id) == null) {
            return "Not Exist";
        }
        //防止传入的id不一致,如user中id属性是2,而url路径中id为1;
        if (user.getId() != id) {
            return "Unmatched parameters";
        }
        userService.update(user);
        return "update success";
    }

    //使用delete请求删除
    @DeleteMapping("{id}")
    public String delete(@PathVariable int id) {
        userService.delete(id);
        return "delete success";
    }

    //使用get方法查询
    @GetMapping()
    public List<User> list() {
        return userService.list();
    }

    //使用get方法查询单个数据
    @GetMapping("{id}")
    public User getById(@PathVariable int id) {
        return userService.findById(id);
    }
}
application.properties、SpringbootApplication.java 和 mysql 数据库
完成上面的代码后需要将 mybatis 和 springboot 整合,需要配置 mybatis 的 mapper 接口位置和 xml 文件的位置,只需要两个代码文件就可以完成的整合。
application.properties
spring.datasource.url=jdbc:mysql://localhost:3306/test
spring.datasource.username=root
spring.datasource.password=
spring.datasource.driver-class-name=com.mysql.jdbc.Driver
mapper xml文件位置
mybatis.mapper-locations=classpath:mapper/*.xml
SpringbootApplication.java
package com.shiyanlou.springboot;

import org.mybatis.spring.annotation.MapperScan;
import org.springframework.boot.SpringApplication;
import org.springframework.boot.autoconfigure.SpringBootApplication;

@SpringBootApplication
//扫描mapper接口位置
@MapperScan(basePackages = {"com.shiyanlou.springboot.dao"})
public class SpringbootApplication {

    public static void main(String[] args) {
        SpringApplication.run(SpringbootApplication.class, args);
    }
}
mysql 数据库配置
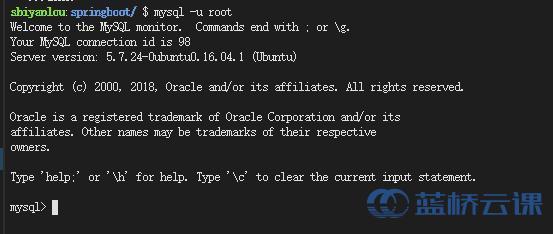
打开终端,启动 mysql 服务
sudo service mysql start
mysql -u root
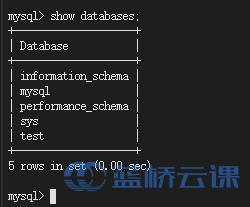
创建数据库test,并且查看数据库是否创建成功。
create database test;
show databases;
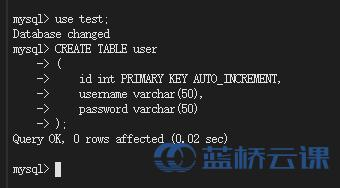
切换到数据库test,创建数据表user;
use test;
CREATE TABLE user
(
    id int PRIMARY KEY AUTO_INCREMENT,
    username varchar(50),
    password varchar(50)
);
单元测试
为了测试我们之前写的功能是否能够正常运行,我们需要在src/test/java目录下新建单元测试文件MVCTest.java
import com.shiyanlou.springboot.SpringbootApplication;
import org.junit.Before;
import org.junit.FixMethodOrder;
import org.junit.Test;
import org.junit.runner.RunWith;
import org.junit.runners.MethodSorters;
import org.springframework.beans.factory.annotation.Autowired;
import org.springframework.boot.test.context.SpringBootTest;
import org.springframework.http.MediaType;
import org.springframework.test.context.junit4.SpringRunner;
import org.springframework.test.web.servlet.MockMvc;
import org.springframework.test.web.servlet.request.MockMvcRequestBuilders;
import org.springframework.test.web.servlet.result.MockMvcResultMatchers;
import org.springframework.test.web.servlet.setup.MockMvcBuilders;
import org.springframework.web.context.WebApplicationContext;

import static org.springframework.test.web.servlet.result.MockMvcResultHandlers.print;

@RunWith(SpringRunner.class)
@SpringBootTest(classes = SpringbootApplication.class)
// 定义单元测试执行顺序,采取测试用例名称升序
@FixMethodOrder(MethodSorters.NAME_ASCENDING)
public class MVCTest {

    @Autowired
    private WebApplicationContext webApplicationContext;
    private MockMvc mockMvc;

    @Before
    public void init() {
        mockMvc = MockMvcBuilders.webAppContextSetup(webApplicationContext).build();
    }

    /**
     * 保存
     *
     * @throws Exception
     */
    @Test
    public void test1() throws Exception {
        mockMvc.perform(MockMvcRequestBuilders.post("/user")
                .contentType(MediaType.APPLICATION_JSON_UTF8)
                .param("id", "1")
                .param("username", "shiyanlou")
                .param("password", "password")
        )
                .andExpect(MockMvcResultMatchers.status().isOk())
                .andExpect(MockMvcResultMatchers.content().string("save success"))
                .andDo(print());
    }

    /**
     * 查询
     *
     * @throws Exception
     */
    @Test
    public void test2() throws Exception {
        mockMvc.perform(MockMvcRequestBuilders.get("/user")
                .contentType(MediaType.APPLICATION_JSON_UTF8)
        )
                .andExpect(MockMvcResultMatchers.status().isOk())
                //采取内容匹配,所以要保证查询出来的数据和我们之前保存的数据是一致的,否则该项单元测试会失败
                .andExpect(MockMvcResultMatchers.content().json("[{\"id\":1,\"username\":\"shiyanlou\",\"password\":\"password\"}]"))
                .andDo(print());
    }

    /**
     * 更新
     *
     * @throws Exception
     */
    @Test
    public void test3() throws Exception {
        mockMvc.perform(MockMvcRequestBuilders.put("/user/1")
                .contentType(MediaType.APPLICATION_JSON_UTF8)
                .param("username", "shiyanlou")
                .param("password", "shiyanlou")
        )
                .andExpect(MockMvcResultMatchers.status().isOk())
                .andExpect(MockMvcResultMatchers.content().string("update success"))
                .andDo(print());
        mockMvc.perform(MockMvcRequestBuilders.get("/user/1")
                .contentType(MediaType.APPLICATION_JSON_UTF8)
        )
                .andExpect(MockMvcResultMatchers.status().isOk())
                .andExpect(MockMvcResultMatchers.content().json("{\"id\":1,\"username\":\"shiyanlou\",\"password\":\"shiyanlou\"}"))
                .andDo(print());
    }

    /**
     * 删除
     *
     * @throws Exception
     */
    @Test
    public void test4() throws Exception {
        mockMvc.perform(MockMvcRequestBuilders.delete("/user/1")
                .contentType(MediaType.APPLICATION_JSON_UTF8)
        )
                .andExpect(MockMvcResultMatchers.status().isOk())
                .andExpect(MockMvcResultMatchers.content().string("delete success"))
                .andDo(print());
    }
}
输入mvn test启动单元测试,等待测试完成,可以看到结果如下(如果测试通过的话)。

项目测试
打开terminal,输入mvn spring-boot:run启动项目,打开第二个terminal,通过 linux 的 curl 来模拟访问。
先通过 POST 请求保存一个 user,注意 curl 命令中的 POST 要大写
curl 中-v 显示请求头信息,-X 指定使用的协议,-d 指定传输的数据。
curl -v -X POST -d "username=shiyanlou&password=springboot" http://localhost:8080/user
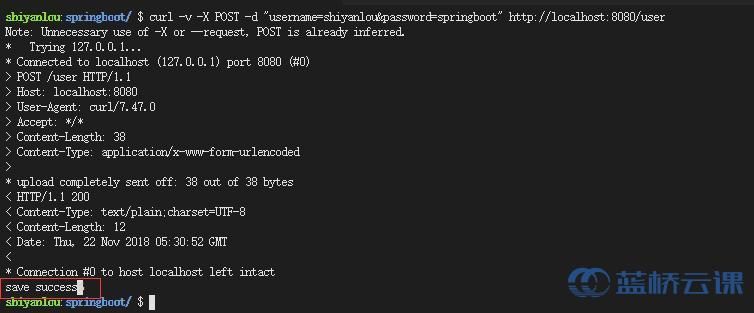
出现这个就说明插入成功了,来看下数据库中是否有数据。使用 get 方式访问http://localhost:8080/user 就可以调用 controller 中的 list 方法。
curl http://localhost:8080/user

可以看到数据,说明确实保存成功了。
接着更新数据,把密码也更新成 shiyanlou,使用 PUT 方法。
curl -v -X PUT -d "username=shiyanlou&password=shiyanlou" http://localhost:8080/user/1
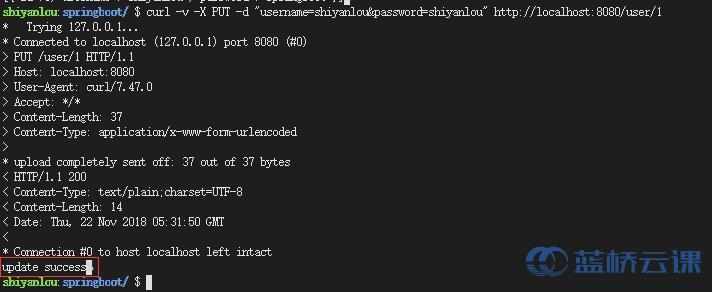
接着使用 getById 方法来查看,使用 GET 方法访问http://localhost:8080/user/1就可以了
curl http://localhost:8080/user/1

成功更新密码。
接着将它删除,使用 DELETE 方法访问http://localhost:8080/user/1即可。
curl -v -X DELETE http://localhost:8080/user/1
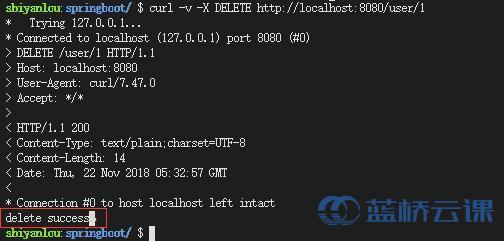
再次使用 GET 访问http://localhost:8080/user

数据已经没有了,说明删除成功。
本文由 liyunfei 创作,采用 知识共享署名4.0
国际许可协议进行许可
本站文章除注明转载/出处外,均为本站原创或翻译,转载前请务必署名
最后编辑时间为: Jun 29,2022