
介绍
假设这样的情况,一个网络商场的一台服务器每秒能处理 40 单下单请求,但是商场搞促销活动的时候,短短几个小时间每秒的下单请求可能能到 400 单,虽然可以通过把服务器增加到十台这样的方式来处理高峰期时间的下单请求,但是平时也维持 10 台服务器的话却会大大增加运营成本。在这种情况下,消息中间件的作用就会被体现出来。
RabbitMQ 是一种应用非常广泛的开源消息中间件,接下来将学习如何在 SpringBoot 中使用 RabbitMQ。
通过代码示例演示基于直接队列模式、分列模式、主题模式、延迟队列的消息发送和接收。
RabbitMQ 工作原理
关于 RabbitMQ,可以用一张图来概括它的工作模式:
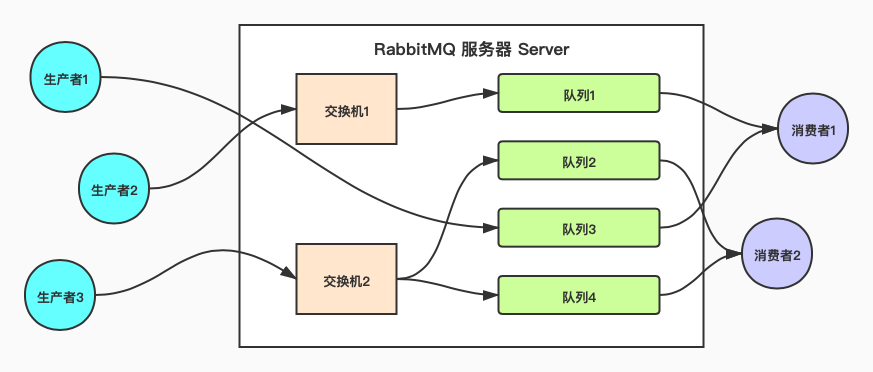
可以看到,生产者是消息推送者,发送消息到 RabbitMQ 服务器中,经过交换机、队列后,最终发送到消费者,也就是消息接收者。
RabbitMQ 中交换机的概念和计算机网络中网络层的路由器概念其实非常相似,它一边可以从多个生产者那接受消息,另外一边可以将消息推送到队列。交换机必须知道如何处理它接受的消息,是应该推送到指定队列还是推送到多个队列。
常用的交换机有以下三种:
-
Direct Exchange:直连型交换机,是默认的交换机类型。它的工作原理是将消息推送到路由键匹配的队列中,关于路由键的设会在后面的实例演示中讲解。
-
Fanout Exchange:扇形交换机,这个交换机没有路由键的概念,它会将消息广播到所有附加到这个交换机的队列上。使用这种交换机,可以完成消息的发布/订阅。
-
Topic Exchange:主题交换机,它与扇形交换机类似,但是,它可以使用 routingKey —— 路由键进行消息匹配,使得消费者可以灵活地订阅想要接受的主题的消息。routingKey 使用下面的字符匹配消息:
*匹配一个分段(用 “.” 分割)的内容#匹配 0 和多个字符
具体使用,在接下来的演示中大家会了解到。
有了交换机,就会有对应的消息发送模式,RabbitMQ 官网介绍了六种消息发送模式:RabbitMQ Tutorials
-
Simple Work Queue (简单工作队列):也就是常说的点对点模式,一条消息由一个消费者进行消费。(当有多个消费者时,默认使用轮训机制把消息分配给消费者)。
-
Work Queues (工作队列):也叫公平队列,能者多劳的消息队列模型。队列必须接收到来自消费者的手动 ack 才可以继续往消费者发送消息。
-
Publish/Subscribe (发布订阅模式):一条消息被多个消费者消费。
-
Routing(路由模式):有选择的接收消息。
-
Topics (主题模式):通过一定的规则来选择性的接收消息
-
RPC 模式:发布者发布消息,并且通过 RPC 方式等待结果。目前这个应该场景少,而且代码也较为复杂,就不做讲解了。
注意:官网最后的 Publisher Confirms 为消息确认机制。指的是生产者如何发送可靠的消息。
这样,就可以总结出每种模式对应需要使用的交换机:
| 消息模式 | 交换机 |
|---|---|
| 简单消息模式 | 空交换机 |
| 发布/订阅模式 | 扇形交换机 |
| 路由模式 | 直连交换机 |
| 主题模式 | 主题交换机 |
接下来就是我们的实例演示环节。
安装 RabbitMQ
自 Debian since 6.0 (squeeze) 和 Ubuntu 9.04 之后,rabbitmq-server 就在 Ubuntu 的官方源里面了,但是如果你想安装最新版本,可以在官网下载,或者使用官方提供的源来安装。本次实验我们就用 Ubuntu 源里的版本安装,所有的依赖都可以被自动安装。
sudo apt-get update
sudo apt-get install rabbitmq-server
启动 RabbitMQ
当 RabbitMQ 安装完毕的时候服务器就会像后台程序一般运行起来了。
服务器相关命令:
启动:sudo service rabbitmq-server start
关闭: sudo service rabbitmq-server stop
查看状态:sudo service rabbitmq-server status
新建项目
由于 maven 下载包需要联网,这里先将 maven 包下载下来,放到本地仓库便可以解决联网的问题
wget http://labfile.oss.aliyuncs.com/courses/1152/m2.zip
unzip m2.zip
mv .m2 /home/shiyanlou/
首先需要新建一个 SpringBoot 项目,具体步骤可以查看前面的章节,这里不再赘述。
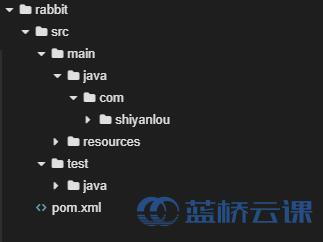
mvn archetype:generate -DgroupId=com.shiyanlou -DartifactId=rabbit -DarchetypeArtifactId=maven-archetype-quickstart
最后形成下面的目录结构:
添加依赖
在使用 Spring 发送和接收 RabbitMQ 消息之前,需要将 Spring Boot 的 AMQP starter 依赖添加到构建文件中,这个依赖会创建一个 AMQP 连接工厂和 RabbitTemplate bean.
Spring Boot 整合 RabbitMQ 只要添加这项依赖就可以了:
<dependency>
    <groupId>org.springframework.boot</groupId>
    <artifactId>spring-boot-starter-amqp</artifactId>
</dependency>
修改 pom.xml,添加下面的依赖
<?xml version="1.0" encoding="UTF-8"?>
<project xmlns="http://maven.apache.org/POM/4.0.0" xmlns:xsi="http://www.w3.org/2001/XMLSchema-instance"
         xsi:schemaLocation="http://maven.apache.org/POM/4.0.0 http://maven.apache.org/xsd/maven-4.0.0.xsd">
    <modelVersion>4.0.0</modelVersion>
    <parent>
        <groupId>org.springframework.boot</groupId>
        <artifactId>spring-boot-starter-parent</artifactId>
        <version>2.1.2.RELEASE</version>
        <relativePath/> <!-- lookup parent from repository -->
    </parent>
    <groupId>com.shiyanlou</groupId>
    <artifactId>rabbit</artifactId>
    <version>0.0.1-SNAPSHOT</version>
    <name>rabbit</name>

    <properties>
        <java.version>1.8</java.version>
    </properties>

    <dependencies>
        <dependency>
            <groupId>org.springframework.boot</groupId>
            <artifactId>spring-boot-starter-amqp</artifactId>
        </dependency>

        <dependency>
            <groupId>org.springframework.boot</groupId>
            <artifactId>spring-boot-starter-test</artifactId>
            <scope>test</scope>
        </dependency>
    </dependencies>

    <build>
        <plugins>
            <plugin>
                <groupId>org.springframework.boot</groupId>
                <artifactId>spring-boot-maven-plugin</artifactId>
            </plugin>

        </plugins>
    </build>

</project>
配置 RabbitMQ
第一种
当需要把应用程序投入生产环境时,就需要认证的 RabbitMQ 代理,它运行在本地机器上并监听 5672 端口。所以需要一个配置文件来配置这些属性。
在 src/main/resources 建立一个 YAML 配置文件 application.yml ,并添加如下的配置信息。
server:
  port: 8080
  servlet:
    context-path: /example
spring:
  rabbitmq:
    host: localhost
    port: 5672
    username: guest
    password: guest
    virtual-host: /
    # 手动提交ack消息
    listener:
      simple:
        acknowledge-mode: manual
      direct:
        acknowledge-mode: manual
guest 是 RabbitMQ 代理默认的账号和密码。
这样,RabbitMQ 就整合进了 Spring Boot 环境中。
第二种
在src/main/resources中的 application.properties 配置文件中添加以下配置
# rabbitmq地址
spring.rabbitmq.host=localhost
# 用户名
spring.rabbitmq.username=guest
# 密码
spring.rabbitmq.password=guest
# 端口
spring.rabbitmq.port=5672
创建常量池
接下来,将演示多种发送消息的模式,在 com.example.mq.rabbitmq.constants 下先创建一个 RabbitMQ 常量池 RabbitConsts.java ,我们将使用这个常量池,规定一些队列、交换机和路由键的名称:
package com.example.mq.rabbitmq.constants;

/**
 * RabbitMQ 常量池
 */
public interface RabbitConsts {
    /**
     * 直接模式1
     */
    String DIRECT_MODE_QUEUE_ONE = "queue.direct.1";

    /**
     * 队列2
     */
    String QUEUE_TWO = "queue.2";

    /**
     * 队列3
     */
    String QUEUE_THREE = "3.queue";

    /**
     * 分列模式
     */
    String FANOUT_MODE_QUEUE = "fanout.mode";

    /**
     * 主题模式
     */
    String TOPIC_MODE_QUEUE = "topic.mode";

    /**
     * 路由1
     */
    String TOPIC_ROUTING_KEY_ONE = "queue.#";

    /**
     * 路由2
     */
    String TOPIC_ROUTING_KEY_TWO = "*.queue";

    /**
     * 路由3
     */
    String TOPIC_ROUTING_KEY_THREE = "3.queue";
}
可以看到路由键 1 和路由键 2 分别为 queue.# 和 *.queue,而队列 2 和队列 3 分别为 queue.2 和 3.queue 并将其作为组件添加进 Spring Boot 项目的时候,对应的路由和队列就会进行匹配。
创建配置类
在上一小节,使用常量池的形式规定了一些队列,主题和路由键的名称,这一节,就需要配置对应的方法,并且使用 @Bean 对其注释,使其作为组件能够添加进 Spring Boot 中。
配置队列,实现如下方法向容器中添加一个 queueName 组件,形式如下:
    @Bean
    public Queue queueName() {
        return new Queue("队列名");
    }
同理,对应的交换机也使用返回 FanoutExchange 类和 TopicExchange 类的方法来完成:
    @Bean
    public FanoutExchange fanoutExchange() {
        return new FanoutExchange("交换机名");
    }

    @Bean
    public TopicExchange topicExchange() {
        return new TopicExchange("交换机名");
    }
最后还需要配置一个返回 RabbitTemplate 类的方法,Spring 对 RabbitMQ 消息支持的核心是 RabbitTemplate ,它是一个简化消息访问的助手类。具体实现形式如下:
    @Bean
    public RabbitTemplate rabbitTemplate(CachingConnectionFactory connectionFactory){
        // RabbitTemplate使用CachingConnectionFactory作为连接工厂
        // 使用完整的(相关的)publisher确认,并使用相关数据和每个消息的返回
        connectionFactory.setPublisherConfirms(true);
        connectionFactory.setPublisherReturns(true);
        // 构造器
        RabbitTemplate rabbitTemplate = new RabbitTemplate(connectionFactory);
        // 在发送消息时设置强制标识,使其返回消息发送成功或丢失的消息
        rabbitTemplate.setMandatory(true);
        rabbitTemplate.setConfirmCallback((correlationData, ack, cause) -> log.info("消息发送成功:correlationData({}),ack({}),cause({})", correlationData, ack, cause));
        rabbitTemplate.setReturnCallback((message, replyCode, replyText, exchange, routingKey) -> log.info("消息丢失:exchange({}),route({}),replyCode({}),replyText({}),message:{}", exchange, routingKey, replyCode, replyText, message));
        return rabbitTemplate;
    }
最后 com.example.mq.rabbitmq.config 中配置类文件 RabbitMqConfig.java 的完整代码如下:
package com.example.mq.rabbitmq.config;

import com.example.mq.rabbitmq.constants.RabbitConsts;
import lombok.extern.slf4j.Slf4j;
import org.springframework.amqp.core.*;
import org.springframework.amqp.rabbit.connection.CachingConnectionFactory;
import org.springframework.amqp.rabbit.core.RabbitTemplate;
import org.springframework.context.annotation.Bean;
import org.springframework.context.annotation.Configuration;

import java.util.HashMap;
import java.util.Map;

/**
 * RabbitMQ 配置类
 */
@Slf4j
@Configuration
public class RabbitMqConfig {

    @Bean
    public RabbitTemplate rabbitTemplate(CachingConnectionFactory connectionFactory){
        // RabbitTemplate使用CachingConnectionFactory作为连接工厂
        // 使用完整的(相关的)publisher确认,并使用相关数据和每个消息的返回
        connectionFactory.setPublisherConfirms(true);
        connectionFactory.setPublisherReturns(true);
        // 构造器
        RabbitTemplate rabbitTemplate = new RabbitTemplate(connectionFactory);
        // 在发送消息时设置强制标识,使其返回消息发送成功或丢失的消息
        rabbitTemplate.setMandatory(true);
        rabbitTemplate.setConfirmCallback((correlationData, ack, cause) -> log.info("消息发送成功:correlationData({}),ack({}),cause({})", correlationData, ack, cause));
        rabbitTemplate.setReturnCallback((message, replyCode, replyText, exchange, routingKey) -> log.info("消息丢失:exchange({}),route({}),replyCode({}),replyText({}),message:{}", exchange, routingKey, replyCode, replyText, message));
        return rabbitTemplate;
    }

    /**
     * 直接模式队列1
     */
    @Bean
    public Queue directOneQueue() {
        return new Queue(RabbitConsts.DIRECT_MODE_QUEUE_ONE);
    }

    /**
     * 队列2
     */
    @Bean
    public Queue queueTwo() {
        return new Queue(RabbitConsts.QUEUE_TWO);
    }

    /**
     * 队列3
     */
    @Bean
    public Queue queueThree() {
        return new Queue(RabbitConsts.QUEUE_THREE);
    }

    /**
     * 分列模式队列
     */
    @Bean
    public FanoutExchange fanoutExchange() {
        return new FanoutExchange(RabbitConsts.FANOUT_MODE_QUEUE);
    }

    /**
     * 分列模式绑定队列1
     */
    @Bean
    public Binding fanoutBinding1(Queue directOneQueue, FanoutExchange fanoutExchange) {
        return BindingBuilder.bind(directOneQueue).to(fanoutExchange);
    }

    /**
     * 分列模式绑定队列2
     */
    @Bean
    public Binding fanoutBinding2(Queue queueTwo, FanoutExchange fanoutExchange) {
        return BindingBuilder.bind(queueTwo).to(fanoutExchange);
    }

    /**
     * 主题模式队列
     * <li>路由格式必须以 . 分隔,比如 user.email 或者 user.aaa.email</li>
     * <li>通配符 * ,代表一个占位符,或者说一个单词,比如路由为 user.*,那么 user.email 可以匹配,但是 user.aaa.email 就匹配不了</li>
     * <li>通配符 # ,代表一个或多个占位符,或者说一个或多个单词,比如路由为 user.#,那么 user.email 可以匹配,user.aaa.email 也可以匹配</li>
     */
    @Bean
    public TopicExchange topicExchange() {
        return new TopicExchange(RabbitConsts.TOPIC_MODE_QUEUE);
    }


    /**
     * 主题模式绑定分列模式
     */
    @Bean
    public Binding topicBinding1(FanoutExchange fanoutExchange, TopicExchange topicExchange) {
        return BindingBuilder.bind(fanoutExchange).to(topicExchange).with(RabbitConsts.TOPIC_ROUTING_KEY_ONE);
    }

    /**
     * 主题模式绑定队列2
     */
    @Bean
    public Binding topicBinding2(Queue queueTwo, TopicExchange topicExchange) {
        return BindingBuilder.bind(queueTwo).to(topicExchange).with(RabbitConsts.TOPIC_ROUTING_KEY_TWO);
    }

    /**
     * 主题模式绑定队列3
     */
    @Bean
    public Binding topicBinding3(Queue queueThree, TopicExchange topicExchange) {
        return BindingBuilder.bind(queueThree).to(topicExchange).with(RabbitConsts.TOPIC_ROUTING_KEY_THREE);
    }
}
可以看到这里使用了一个比较陌生的注解:
-
@Slf4j:这是 Lombok 插件中一个常用注解,当需要输出一些日志消息的时候,如果不想每次都写private final Logger logger = LoggerFactory.getLogger(类名.class);这样臃肿且没有技术含量的 样板式代码 ,就可以使用
@Slf4j代码。添加@Slf4j注解的类,可以直接使用log.info();输出日志信息。例如:
log.info("Hello, shiyanlou.");或者
Stirng name = "shiyanlou";
log.info("Hello, my name is {}.", name);
Lombok 里面的一些注解就是为了消除这样的样板式代码,在后面还会有介绍。官方文档 Annotation Type Slf4j
编写消息处理类
在我们的讲解中,仅讲解 com.example.mq.rabbitmq.handler 下直接模式的代码 DirectQueueOneHandler.java ,其它的代码几乎一样。
当消息抵达 RabbitMQ 的队列中时,某个方法应该被调用,这个方法用于进行消息的监听,在消息被消费者消费以后,进行消息确认。对这样的方法,添加 @RabbitListener(queues = 队列名) 注解。队列名是这个方法所监听的消息队列的名称。具体代码如下:
package com.example.mq.rabbitmq.handler;

import com.example.mq.rabbitmq.constants.RabbitConsts;
import com.example.mq.rabbitmq.message.MessageStruct;
import com.rabbitmq.client.Channel;
import lombok.extern.slf4j.Slf4j;
import org.springframework.amqp.core.Message;
import org.springframework.amqp.rabbit.annotation.RabbitHandler;
import org.springframework.amqp.rabbit.annotation.RabbitListener;
import org.springframework.stereotype.Component;

import java.io.IOException;

@Slf4j
@RabbitListener(queues = RabbitConsts.DIRECT_MODE_QUEUE_ONE)
@Component
public class DirectQueueOneHandler {

    // @RabbitHandler
    public void directHandlerAutoAck(MessageStruct message) {
        log.info("直接队列处理器,接收消息:{}", message.getMessage());
    }

    @RabbitHandler
    public void directHandlerManualAck(MessageStruct messageStruct, Message message, Channel channel) {
        //  如果手动ACK,消息会被监听消费,但是消息在队列中依旧存在,如果 未配置 acknowledge-mode 默认是会在消费完毕后自动ACK掉
        final long deliveryTag = message.getMessageProperties().getDeliveryTag();
        try {
            log.info("直接队列1,手动ACK,接收消息:{}", messageStruct.getMessage());
            // 通知 MQ 消息已被成功消费,可以ACK了
            channel.basicAck(deliveryTag, false);
        } catch (IOException e) {
            try {
                // 处理失败,重新压入MQ
                channel.basicRecover();
            } catch (IOException e1) {
                e1.printStackTrace();
            }
        }
    }
}
RabbitMQConfig
在src/main/java/com/shiyanlou/中新建RabbitConfig用来配置 RabbitMQ,比如创建队列,创建 Exchange 等。这里我们采用发布/订阅模式,所以我们建立了一个 Exchange 和两个队列。
package com.shiyanlou;

import org.springframework.amqp.core.Binding;
import org.springframework.amqp.core.BindingBuilder;
import org.springframework.amqp.core.FanoutExchange;
import org.springframework.amqp.core.Queue;
import org.springframework.context.annotation.Bean;
import org.springframework.stereotype.Component;

/**
 * @author shiyanlou
 */
@Component
public class RabbitConfig {

    @Bean
    public Queue queueA() {
        return new Queue("queueA");
    }

    @Bean
    public Queue queueB() {
        return new Queue("queueB");
    }

    /**
     * 建立一个fanout模式的Exchange
     *
     * @return
     */
    @Bean
    FanoutExchange fanoutExchange() {
        return new FanoutExchange("fanoutExchange");
    }

    /**
     * 绑定队列A到交换机
     *
     * @param queueA
     * @param fanoutExchange
     * @return
     */
    @Bean
    public Binding bindingQueueA(Queue queueA, FanoutExchange fanoutExchange) {
        return BindingBuilder.bind(queueA).to(fanoutExchange);
    }

    /**
     * 绑定队列A到交换机
     *
     * @param queueB
     * @param fanoutExchange
     * @return
     */
    @Bean
    public Binding bindingQueueB(Queue queueB, FanoutExchange fanoutExchange) {
        return BindingBuilder.bind(queueB).to(fanoutExchange);
    }

}
创建提供者
在src/main/java/com/shiyanlou/中新建Provider用于生产消息
package com.shiyanlou;

import org.springframework.amqp.core.AmqpTemplate;
import org.springframework.beans.factory.annotation.Autowired;
import org.springframework.stereotype.Component;

/**
 * @author shiyanlou
 */
@Component
public class Provider {

    @Autowired
    private AmqpTemplate amqpTemplate;

    public void sendMessage(String msg){
        System.out.println("提供者 发送消息:" + msg);
        amqpTemplate.convertAndSend("fanoutExchange","", msg);
    }
}
创建消费者
在src/main/java/com/shiyanlou/中新建Consumer用于消费消息
package com.shiyanlou;

import org.springframework.amqp.rabbit.annotation.RabbitListener;
import org.springframework.stereotype.Component;

/**
 * @author shiyanlou
 */
@Component
public class Consumer {

    @RabbitListener(queues = "queueA")
    public void receiveQueueA(String msg){
        System.out.println("消费者 queueA 收到消息:" + msg);
    }

    @RabbitListener(queues = "queueB")
    public void receiveQueueB(String msg){
        System.out.println("消费者 queueB 收到消息:" + msg);
    }
}
添加 Spring Boot 启动类
第一种
在 com.example.mq.rabbitmq 下添加启动类 RabbitmqdemoApplication.java :
package com.example.mq.rabbitmq;

import org.springframework.boot.SpringApplication;
import org.springframework.boot.autoconfigure.SpringBootApplication;

@SpringBootApplication
public class RabbitmqdemoApplication {

    public static void main(String[] args) {
        SpringApplication.run(RabbitmqdemoApplication.class, args);
    }

}
启动类在后面的实验中,除了类名和 package 不一致,其他部分完全相同,我们就不特别去讲解。同学们在坐后面的实验时,记得自行修改启动类。
第二种
在src/main/java/com/shiyanlou新建 SpringBoot 启动类RabbitApplication.java
package com.shiyanlou;

import org.springframework.boot.SpringApplication;
import org.springframework.boot.autoconfigure.SpringBootApplication;

@SpringBootApplication
public class RabbitApplication {

    public static void main(String[] args) {
        SpringApplication.run(RabbitApplication.class, args);
    }

}
单元测试
第一种
到目前为止,已经将所需的所有配置配置完毕了,接下来就可以向 RabbitMQ 中发送消息了。RabbitMQ 发送消息使用的是 RabbitTemplate 中的 send() 和 converAndSend() 方法。在此列举出一些用法:
// 发送原始的消息
void send(Message message) throws AmqpException;
void send(String routingKey, Message message) throws AmqpException;
void send(String exchange, String routingKey, Message message)
                    throws AmqpException;

// 发送根据对象转换而成的消息
void convertAndSend(Object message) throws AmqpException;
void convertAndSend(String routingKey, Object message)
                    throws AmqpException;
void convertAndSend(String exchange, String routingKey,
                    Object message) throws AmqpException;
可以看到,前三个 send() 方法直接发送了原始的 Message 对象, 后面三个 convertAndSend() 方法接受了一个对象,然后在后台将其转换为 Message 对象。
在此直接演示 convertAndSend() 方法的使用。配置一个非 Message 的消息对象类 MessageStruct ,代码如下:
package com.example.mq.rabbitmq.message;

import lombok.AllArgsConstructor;
import lombok.Builder;
import lombok.Data;
import lombok.NoArgsConstructor;

import java.io.Serializable;

@Data
@Builder
@NoArgsConstructor
@AllArgsConstructor
public class MessageStruct implements Serializable {
    private static final long serialVersionUID = 392365881428311040L;

    private String message;

}
这里也出现了的 Lombok 的几个注解,分别作一些解释:
@Data:Java 的封装特性要求我们对类中的private类型的属性要写 getter/setter 这种方法,而使用@Data注解标注以后,就只需要在类中配置好属性名就可以了。除了 getter/setter 之外还实现的方法,同学们可以参考官方说明:Annotation Type Data@NoArgsConstructor:这个注解生成该类的无参构造器。Annotation Type NoArgsConstructor@AllArgsConstructor:这个注解生成了该类的全参构造器。Annotation Type AllArgsConstructor@Builder:将该类转变为建造者模式。关于建造者模式,需要同学们自己下去了解 Annotation Type Builder
在 com.example.mq.rabbitmq 中新建一个测试类 RabbitmqdemoApplicationTests.java 来发送消息,具体代码如下:
package com.example.mq.rabbitmq;

import com.example.mq.rabbitmq.constants.RabbitConsts;
import com.example.mq.rabbitmq.message.MessageStruct;
import org.junit.Test;
import org.junit.runner.RunWith;
import org.springframework.amqp.rabbit.core.RabbitTemplate;
import org.springframework.beans.factory.annotation.Autowired;
import org.springframework.boot.test.context.SpringBootTest;
import org.springframework.test.context.junit4.SpringRunner;

@RunWith(SpringRunner.class)
@SpringBootTest
public class RabbitmqdemoApplicationTests {

    @Autowired
    private RabbitTemplate rabbitTemplate;

    /**
     * 测试直接模式发送
     */
    @org.junit.Test
    public void sendDirect() {
        rabbitTemplate.convertAndSend(RabbitConsts.DIRECT_MODE_QUEUE_ONE, new MessageStruct("direct message"));
    }

    /**
     * 测试分列模式发送
     */
    @org.junit.Test
    public void sendFanout() {
        rabbitTemplate.convertAndSend(RabbitConsts.FANOUT_MODE_QUEUE, "", new MessageStruct("fanout message"));
    }

    /**
     * 测试主题模式发送1
     */
    @org.junit.Test
    public void sendTopic1() {
        rabbitTemplate.convertAndSend(RabbitConsts.TOPIC_MODE_QUEUE, "queue.aaa.bbb", new MessageStruct("topic message"));
    }

    /**
     * 测试主题模式发送2
     */
    @org.junit.Test
    public void sendTopic2() {
        rabbitTemplate.convertAndSend(RabbitConsts.TOPIC_MODE_QUEUE, "ccc.queue", new MessageStruct("topic message"));
    }

    /**
     * 测试主题模式发送3
     */
    @org.junit.Test
    public void sendTopic3() {
        rabbitTemplate.convertAndSend(RabbitConsts.TOPIC_MODE_QUEUE, "3.queue", new MessageStruct("topic message"));
    }
}
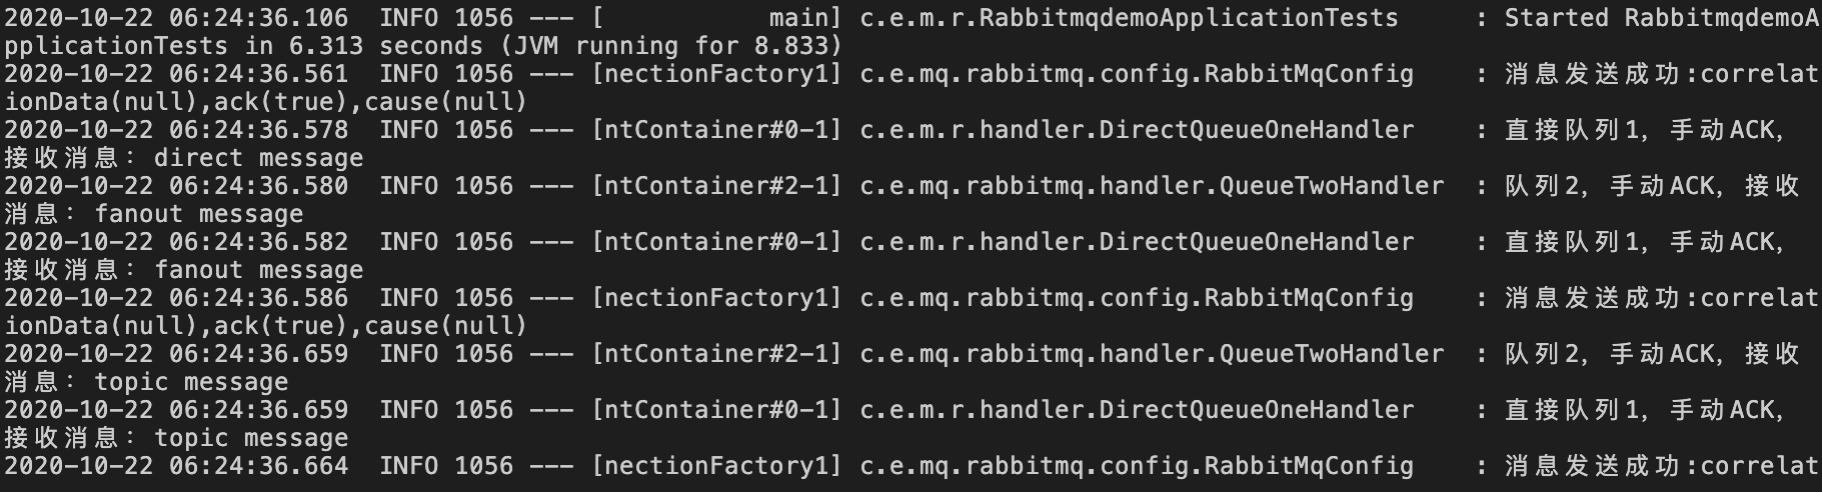
然后输入以下的命令,运行测试类:
cd spring-boot-mq-rabbitmq
mvn test
最终可以看到程序正确运行的结果,在测试类中发送的消息成功地被监听器捕获到了:
第二种
一切准备就绪后,我们需要编写单元测试,来检查是否程序是否可以正常运行。在·src/test/java下新建RabbitApplicationTests
import com.shiyanlou.Provider;
import com.shiyanlou.RabbitApplication;
import org.junit.Before;
import org.junit.Test;
import org.junit.runner.RunWith;
import org.springframework.beans.factory.annotation.Autowired;
import org.springframework.boot.test.context.SpringBootTest;
import org.springframework.test.context.junit4.SpringRunner;

@RunWith(SpringRunner.class)
@SpringBootTest(classes = RabbitApplication.class)
public class RabbitApplicationTests {

    @Autowired
    private Provider provider;

    @Test
    public void providerTest() {
        provider.sendMessage("Hello Shiyanlou");
    }

}
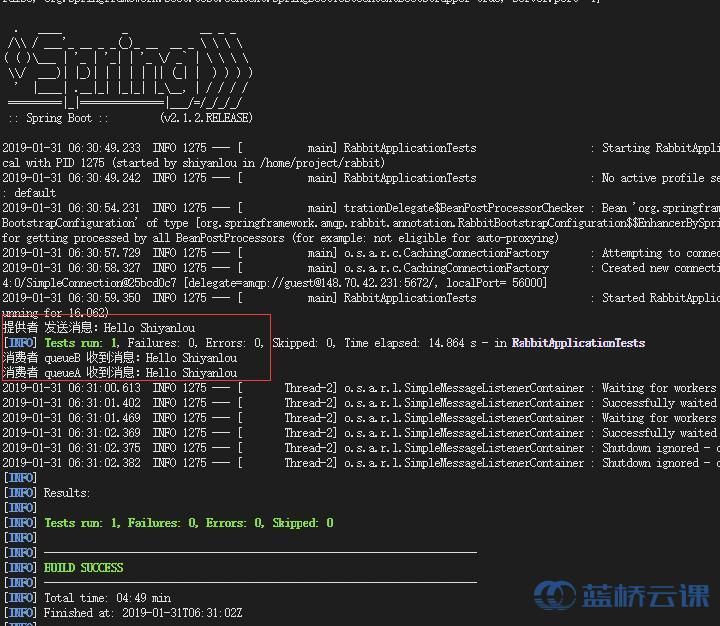
运行单元测试
cd /home/project/rabbit
mvn test
本文由 liyunfei 创作,采用 知识共享署名4.0
国际许可协议进行许可
本站文章除注明转载/出处外,均为本站原创或翻译,转载前请务必署名
最后编辑时间为: Jun 29,2022